Linux基础服务
一、linux搭建ftp服务器,使用ftp图形化客户端实现ftp文件上传/下载
ftp是什么
文件传输协议(file Transfer Protocol,FTP),它工作在应用层,由客户端软件和服务端软件两个部分共同实现文件传输功能,使用 TCP 传输而不是 UDP, 客户在和服务器建立连接前要经过一个“三次握手”的过程, 保证客户与服务器之间的连接是可靠的, 而且是面向连接,为数据传输提供可靠保证。
端口
ftp 主要使用20和21端口
20端口传输数据;21端口建立连接
模式
主动模式: 服务器主动连接客户端传输。
被动模式: 服务器等待客户端连接。
部署FTP服务器
1.查看是否安装过vsftp,没有就下载vsftp
[root@localhost ~]# rpm -q vsftpd
未安装软件包 vsftpd
[root@localhost ~]# yum -y install vsftpd
已加载插件:fastestmirror, langpacks
Loading mirror speeds from cached hostfile
 * base: mirrors.aliyun.com
 * epel: repo.jing.rocks
 * extras: mirrors.aliyun.com
 * updates: mirrors.aliyun.com
正在解决依赖关系
--> 正在检查事务
---> 软件包 vsftpd.x86_64.0.3.0.2-29.el7_9 将被 安装
--> 解决依赖关系完成

依赖关系解决

=============================================================================================================================================================
 Package                            架构                               版本                                        源                                   大小
=============================================================================================================================================================
正在安装:
 vsftpd                             x86_64                             3.0.2-29.el7_9                              updates                             173 k

事务概要
=============================================================================================================================================================
安装  1 软件包

总下载量:173 k
安装大小:353 k
Downloading packages:
vsftpd-3.0.2-29.el7_9.x86_64.rpm                                                                                                      | 173 kB  00:00:00
Running transaction check
Running transaction test
Transaction test succeeded
Running transaction
  正在安装    : vsftpd-3.0.2-29.el7_9.x86_64                                                                                                             1/1
  验证中      : vsftpd-3.0.2-29.el7_9.x86_64                                                                                                             1/1

已安装:
  vsftpd.x86_64 0:3.0.2-29.el7_9

完毕!
2.查看vsftp软件的详细信息
[root@localhost ~]# rpm -qi vsftpd
Name        : vsftpd
Version     : 3.0.2
Release     : 29.el7_9
Architecture: x86_64
Install Date: 2025年06月18日 星期三 09时18分44秒
Group       : System Environment/Daemons
Size        : 361349
License     : GPLv2 with exceptions
Signature   : RSA/SHA256, 2021年06月11日 星期五 23时06分15秒, Key ID 24c6a8a7f4a80eb5
Source RPM  : vsftpd-3.0.2-29.el7_9.src.rpm
Build Date  : 2021年06月10日 星期四 00时15分50秒
Build Host  : x86-02.bsys.centos.org
Relocations : (not relocatable)
Packager    : CentOS BuildSystem <http://bugs.centos.org>
Vendor      : CentOS
URL         : https://security.appspot.com/vsftpd.html
Summary     : Very Secure Ftp Daemon
Description :
vsftpd is a Very Secure FTP daemon. It was written completely from
scratch.
3.启动vsftp服务
[root@localhost ~]# systemctl start vsftpd
4.判断ftp服务是否启动
查看vsftpd进程
[root@localhost ~]# ps -aux | grep vsftpd
root      19341  0.0  0.0  53264   576 ?        Ss   09:39   0:00 /usr/sbin/vsftpd /etc/vsftpd/vsftpd.conf
root      19358  0.0  0.0 112720   968 pts/1    S+   09:40   0:00 grep --color=auto vsftpd
查看vsftpd端口
[root@localhost ~]# netstat -anplut | grep vsftpd
tcp6       0      0 :::21                   :::*                    LISTEN      19341/vsftpd
查看vsftpd服务状态
[root@localhost ~]# systemctl status vsftpd
● vsftpd.service - Vsftpd ftp daemon
   Loaded: loaded (/usr/lib/systemd/system/vsftpd.service; disabled; vendor preset: disabled)
   Active: active (running) since 三 2025-06-18 09:39:06 CST; 2min 52s ago
  Process: 19340 ExecStart=/usr/sbin/vsftpd /etc/vsftpd/vsftpd.conf (code=exited, status=0/SUCCESS)
 Main PID: 19341 (vsftpd)
    Tasks: 1
   CGroup: /system.slice/vsftpd.service
           └─19341 /usr/sbin/vsftpd /etc/vsftpd/vsftpd.conf

6月 18 09:39:06 localhost.localdomain systemd[1]: Starting Vsftpd ftp daemon...
6月 18 09:39:06 localhost.localdomain systemd[1]: Started Vsftpd ftp daemon.
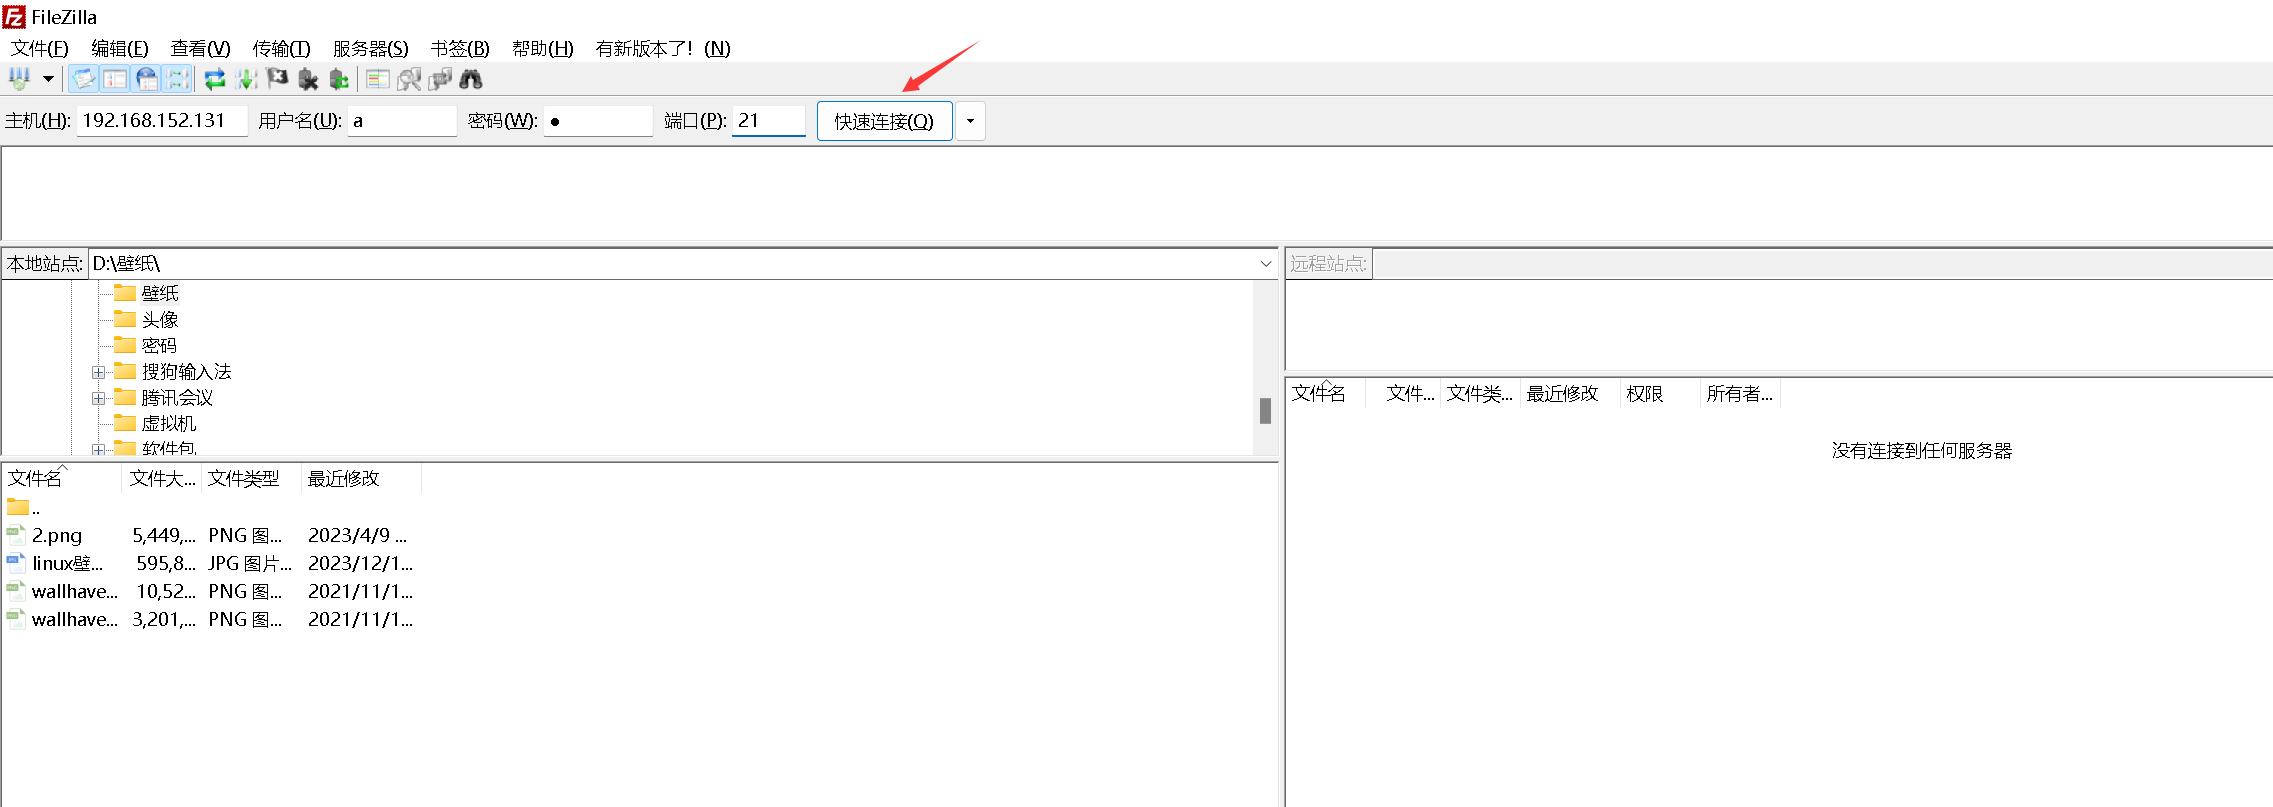
5.登录ftp服务
正常登录FTP服务器,需要用户名,密码 ftp文件的位置在/home/用户名/
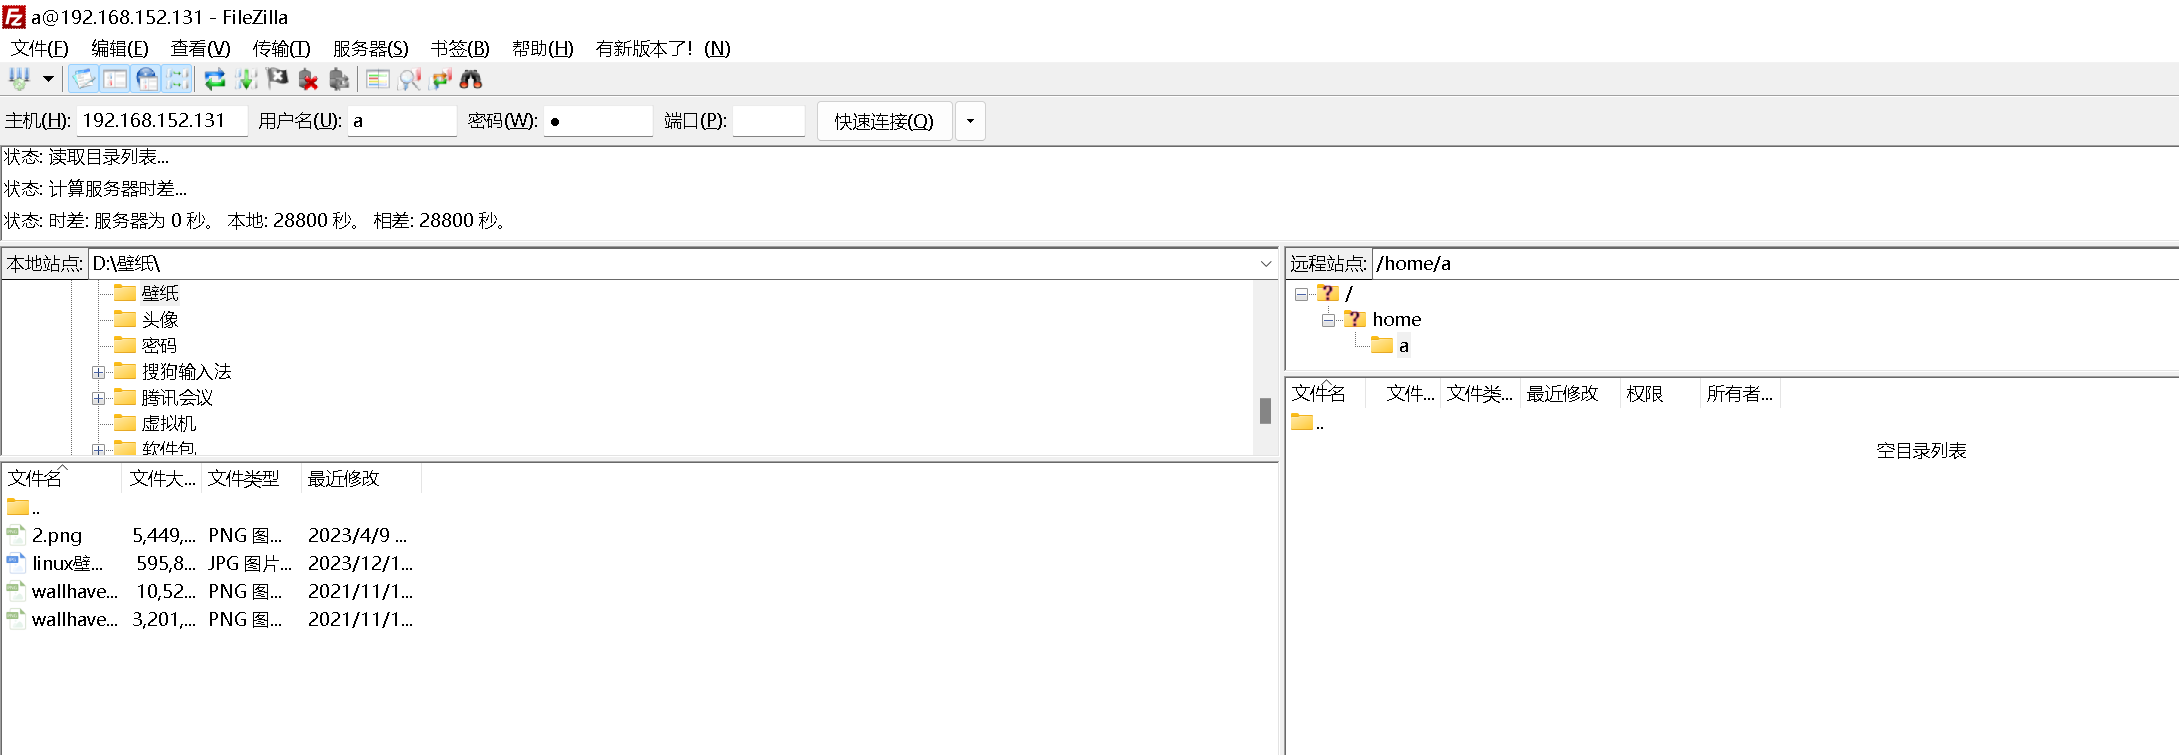
输入主机ip,用户名,密码,端口
连接成功
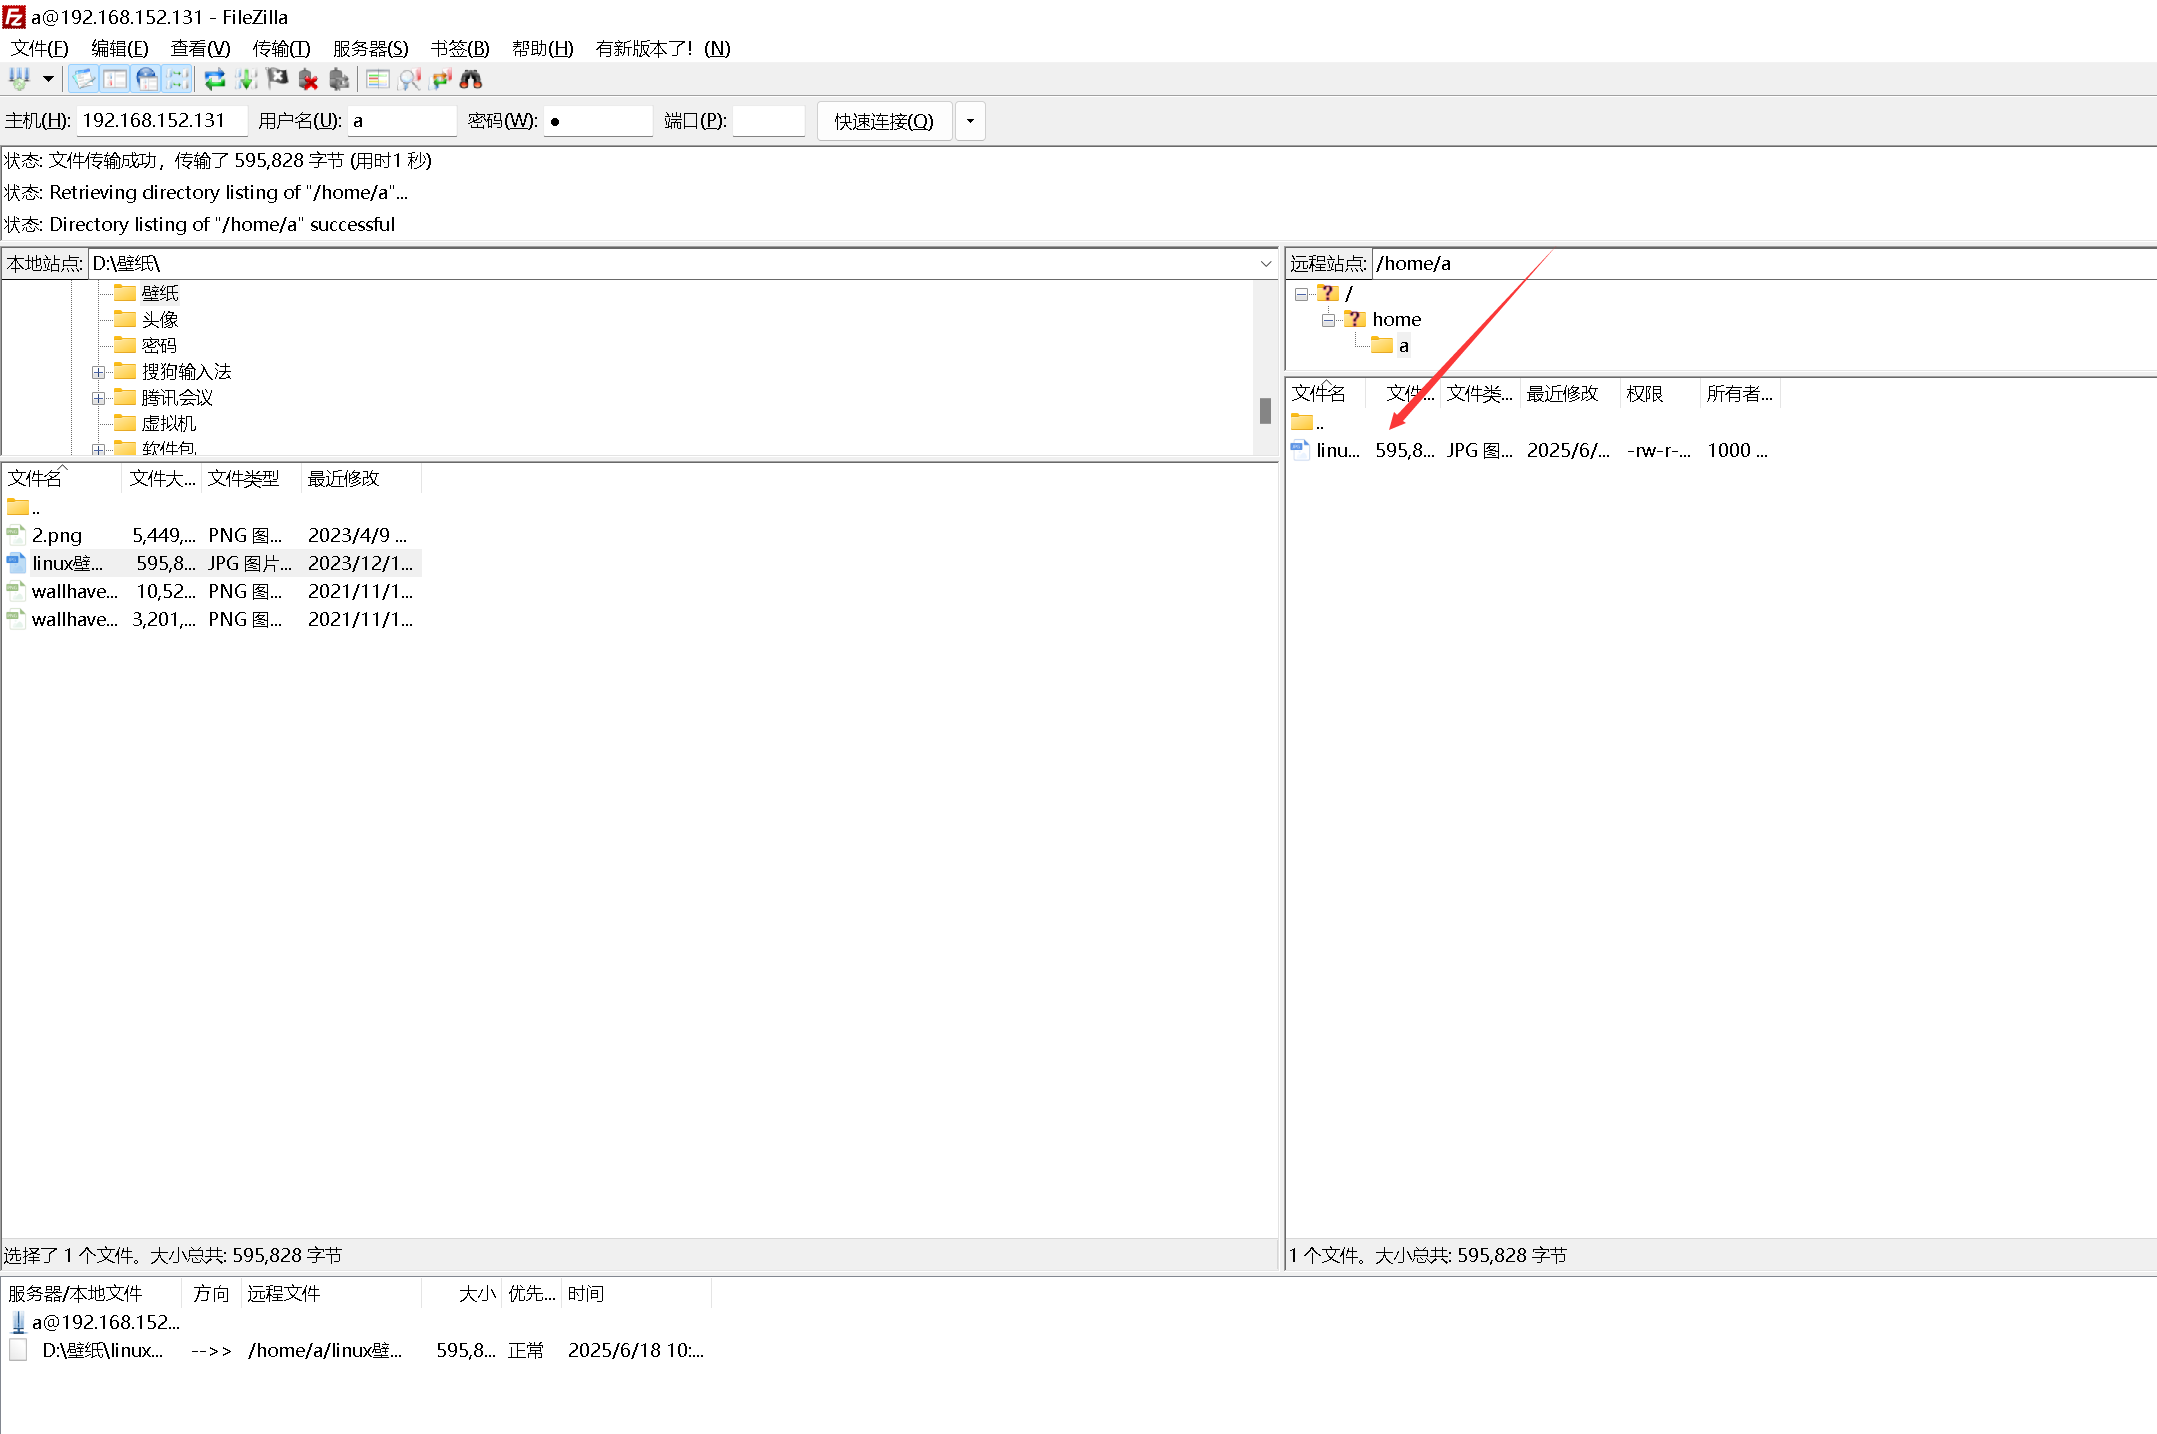
6.上传文件到服务器

上传成功
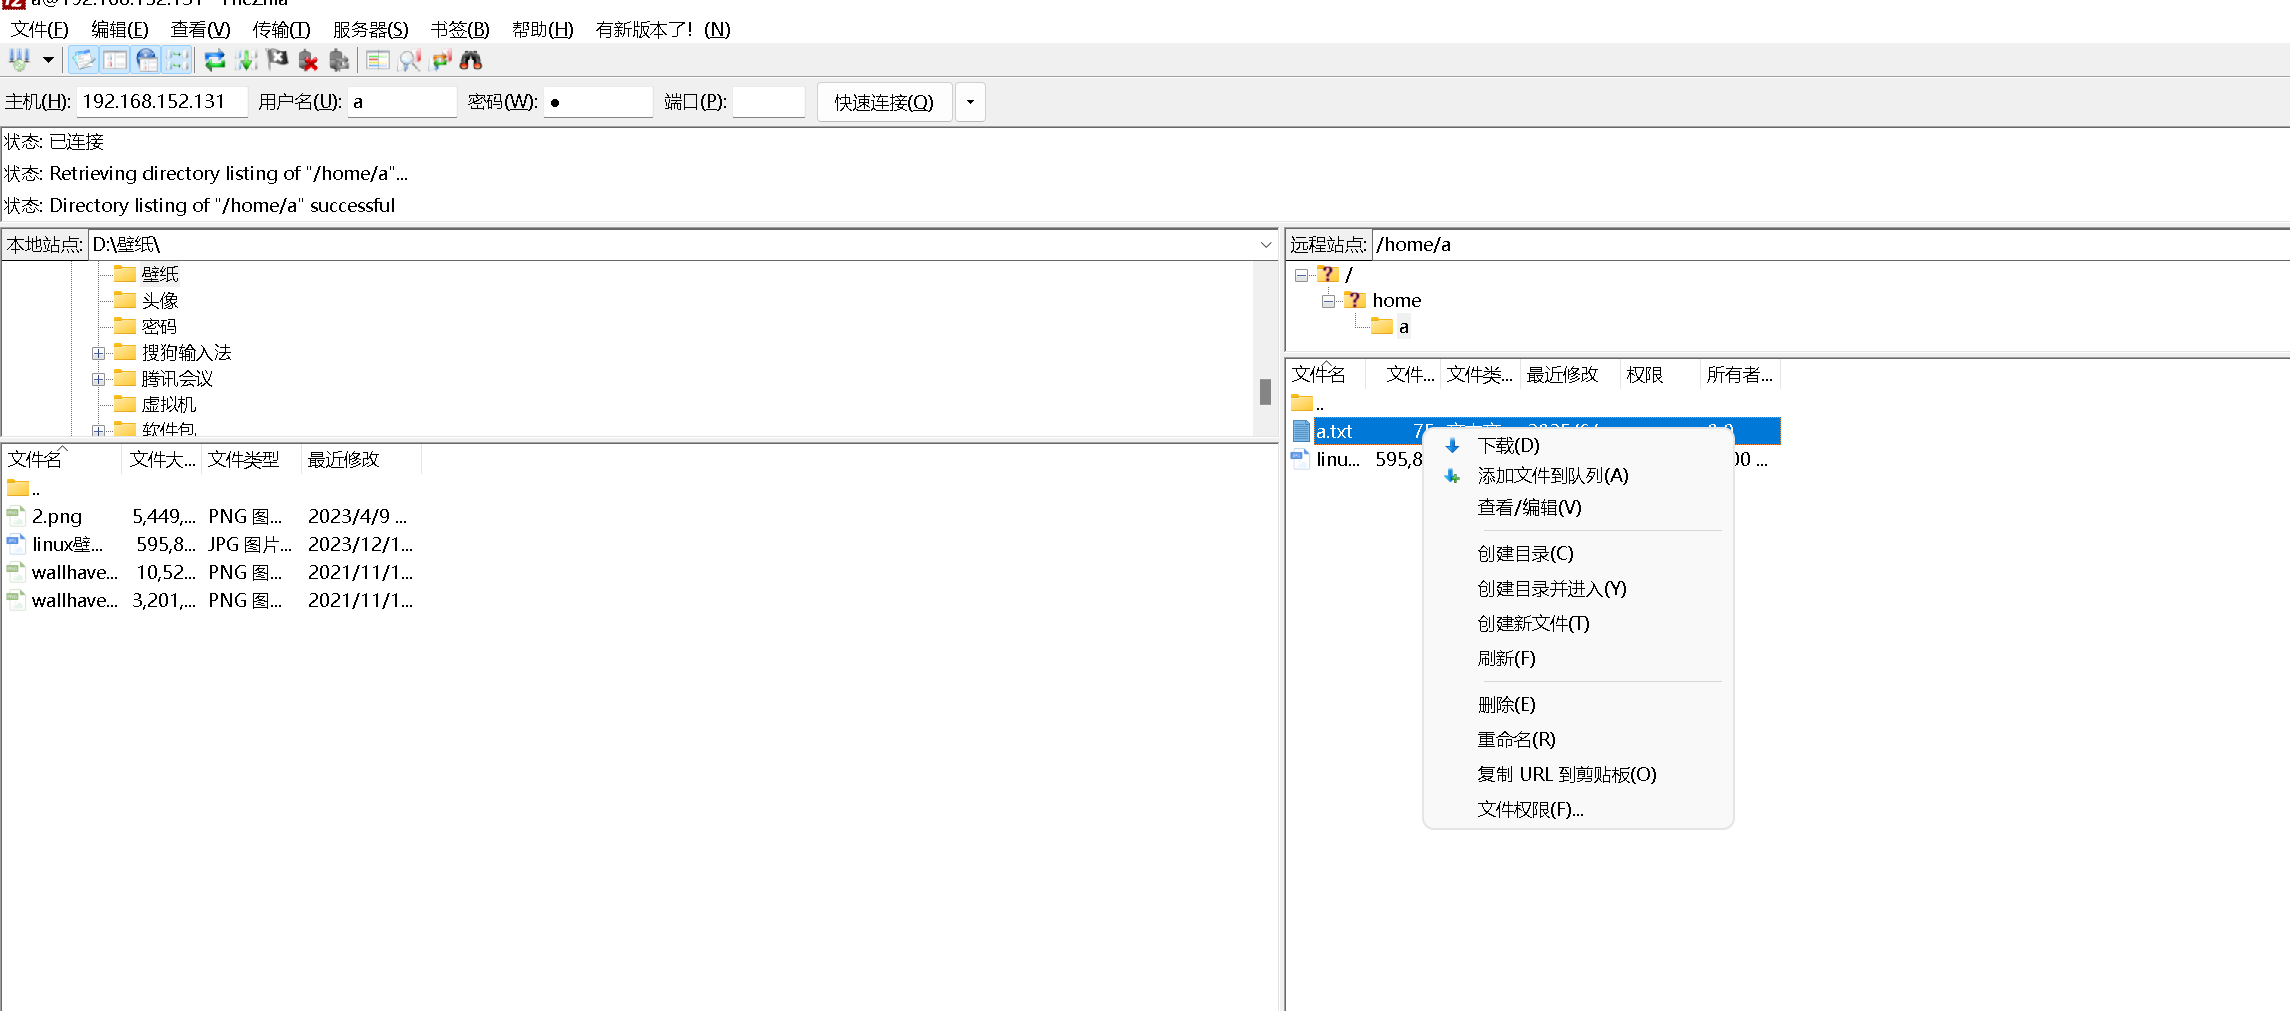
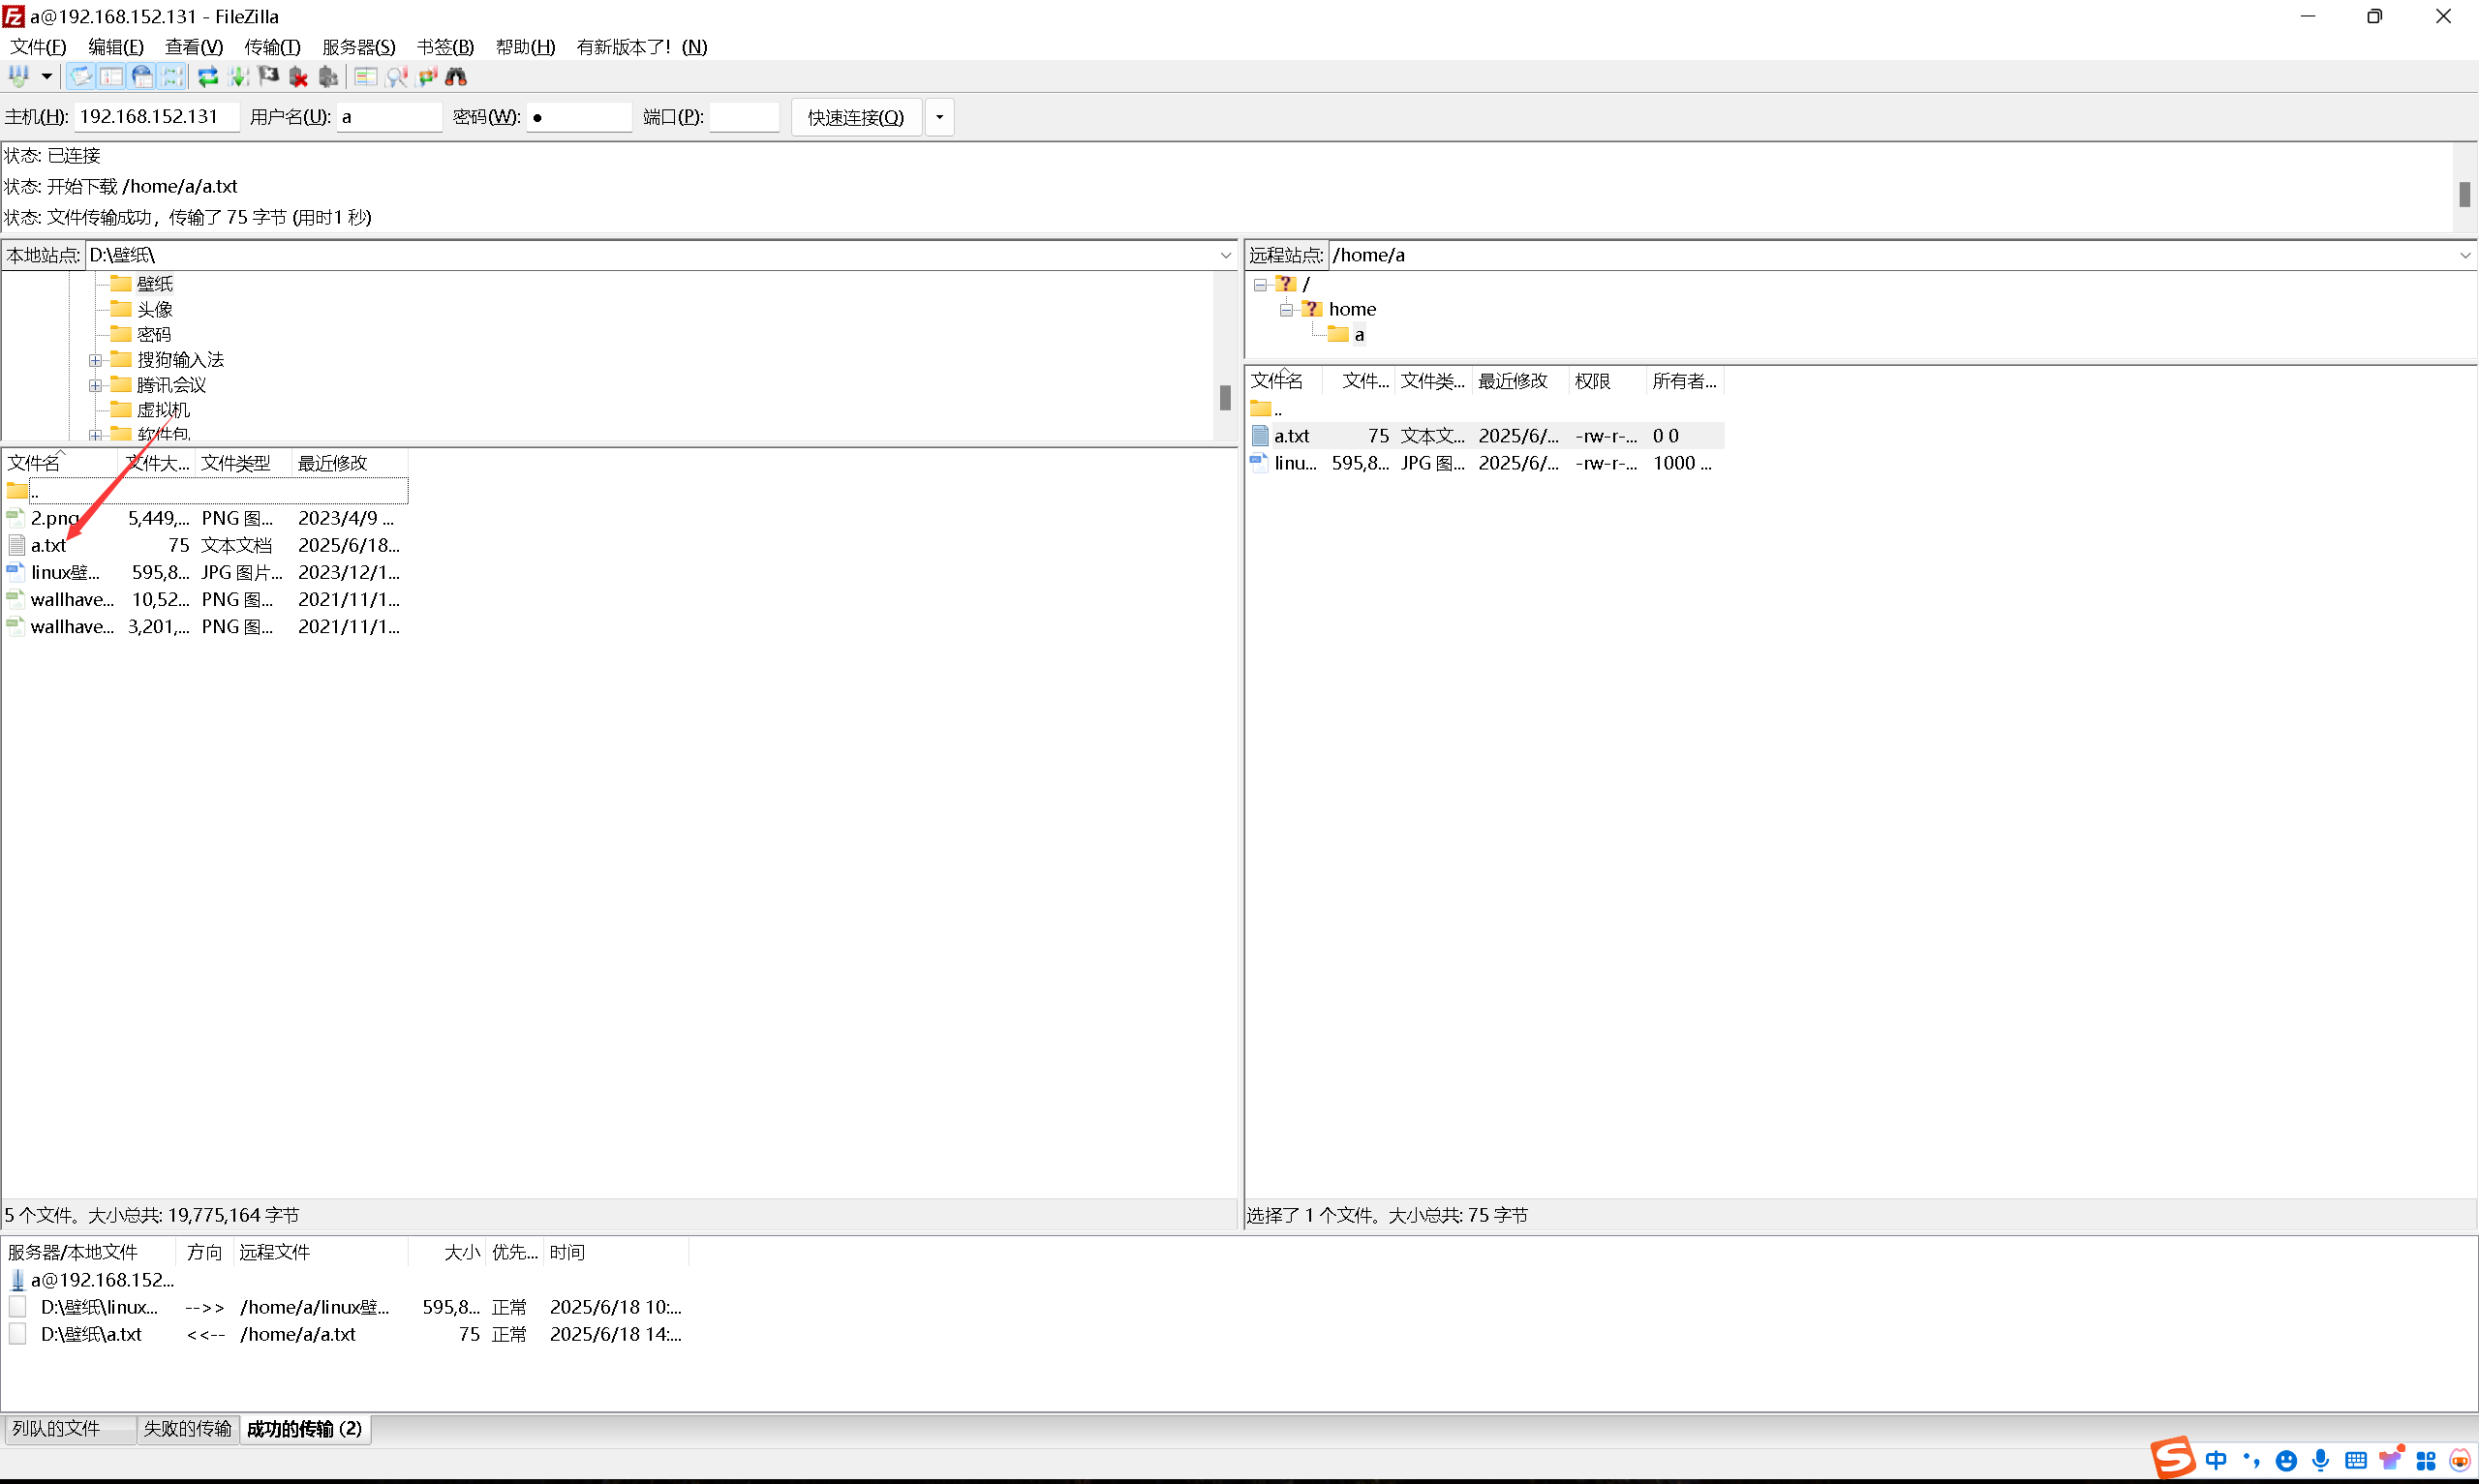
7.下载文件
首先在ftp服务器上创建了一个文件
[root@localhost ~]# cd /home/a/
[root@localhost a]# ls
linux壁纸.jpg
[root@localhost a]# vim a.txt
[root@localhost a]# ls
linux壁纸.jpg
[root@localhost a]# for i in {1..5};do
> echo "This is line $i" >> a.txt
> done
[root@localhost a]# ls
a.txt  linux壁纸.jpg
[root@localhost a]# cat a.txt
This is line 1
This is line 2
This is line 3
This is line 4
This is line 5
匿名登录FTP服务器,目录位置在/var/ftp/
二、rsync:准备两台服务器,一台server端一台client端,实现将server端的/rsync_server目录下的文件增量同步到client端的/rsync_client目录下。最后配置一个每5分钟同步一次的定时任务。实现定时文件同步
rsync是什么
rsync是Linux/unix下一个用于远程文件(目录)同步的一个精巧的小工具程序
Server端:192.168.152.131
client端:192.168.152.133
在server端事先创建/rsync_server目录,并在该目录下创建了10个文本文件
[root@localhost ~]# mkdir /rsync_server
[root@localhost ~]# touch /rsync_server/{1..10}.txt
[root@localhost ~]# ls /rsync_server/
10.txt  1.txt  2.txt  3.txt  4.txt  5.txt  6.txt  7.txt  8.txt  9.txt
在client端创建/rsync_client目录
[root@localhost yum.repos.d]# mkdir /rsync_client
[root@localhost yum.repos.d]# ls /
bin  boot  dev  etc  home  lib  lib64  media  mnt  opt  proc  root  rsync_client  run  sbin  srv  sys  tmp  usr  var
1.server端安装rsync
[root@localhost a]# yum -y install rsync
已加载插件:fastestmirror, langpacks
Loading mirror speeds from cached hostfile
 * base: mirrors.aliyun.com
 * epel: repo.jing.rocks
 * extras: mirrors.aliyun.com
 * updates: mirrors.aliyun.com
正在解决依赖关系
--> 正在检查事务
---> 软件包 rsync.x86_64.0.3.1.2-4.el7 将被 升级
---> 软件包 rsync.x86_64.0.3.1.2-12.el7_9 将被 更新
--> 解决依赖关系完成

依赖关系解决

=============================================================================================================================================================
 Package                           架构                               版本                                         源                                   大小
=============================================================================================================================================================
正在更新:
 rsync                             x86_64                             3.1.2-12.el7_9                               updates                             408 k

事务概要
=============================================================================================================================================================
升级  1 软件包

总计:408 k
Downloading packages:
Running transaction check
Running transaction test
Transaction test succeeded
Running transaction
  正在更新    : rsync-3.1.2-12.el7_9.x86_64                                                                                                              1/2
  清理        : rsync-3.1.2-4.el7.x86_64                                                                                                                 2/2
  验证中      : rsync-3.1.2-12.el7_9.x86_64                                                                                                              1/2
  验证中      : rsync-3.1.2-4.el7.x86_64                                                                                                                 2/2

更新完毕:
  rsync.x86_64 0:3.1.2-12.el7_9

完毕!
2.将server端的/rsync_server目录下的文件增量同步到client端的/rsync_client目录下
[root@localhost ~]# rsync -avz -e 'ssh' /rsync_server/ root@192.168.152.133:/rsync_client/
The authenticity of host '192.168.152.133 (192.168.152.133)' can't be established.
ECDSA key fingerprint is SHA256:rYv8pu5rFLwtOk30LCS6zOASs3wWAtmvhJbpWFf1Pmw.
ECDSA key fingerprint is MD5:ac:d7:b1:56:80:8d:4e:12:8c:96:b8:25:81:18:f8:22.
Are you sure you want to continue connecting (yes/no)? y
Please type 'yes' or 'no': yes
Warning: Permanently added '192.168.152.133' (ECDSA) to the list of known hosts.
root@192.168.152.133's password:
sending incremental file list
./
1.txt
10.txt
2.txt
3.txt
4.txt
5.txt
6.txt
7.txt
8.txt
9.txt
3.在client端验证
[root@localhost yum.repos.d]# ls /rsync_client/
10.txt  1.txt  2.txt  3.txt  4.txt  5.txt  6.txt  7.txt  8.txt  9.txt
4.配置一个每5分钟同步一次的定时任务,实现定时文件同步
(1)server端配置ssh免密
[root@localhost ~]# ssh-keygen -t rsa
Generating public/private rsa key pair.
Enter file in which to save the key (/root/.ssh/id_rsa):
Enter passphrase (empty for no passphrase):
Enter same passphrase again:
Your identification has been saved in /root/.ssh/id_rsa.
Your public key has been saved in /root/.ssh/id_rsa.pub.
The key fingerprint is:
SHA256:9mvKCaMLXYvIMrMv2MaXk39XVHRzHot1yz3nTpcBG6Q root@localhost.localdomain
The key's randomart image is:
+---[RSA 2048]----+
|            .=.++|
|            . OoO|
|           E + *+|
|            .  .=|
|      . S  .   .+|
| . o o o .  .  o.|
|=o+ oo+   ..    .|
|o=+.=. +..o.     |
|.+..o+..++.      |
+----[SHA256]-----+
[root@localhost ~]# ssh-copy-id root@192.168.152.133
/usr/bin/ssh-copy-id: INFO: Source of key(s) to be installed: "/root/.ssh/id_rsa.pub"
/usr/bin/ssh-copy-id: INFO: attempting to log in with the new key(s), to filter out any that are already installed
/usr/bin/ssh-copy-id: INFO: 1 key(s) remain to be installed -- if you are prompted now it is to install the new keys
root@192.168.152.133's password:

Number of key(s) added: 1

Now try logging into the machine, with:   "ssh 'root@192.168.152.133'"
and check to make sure that only the key(s) you wanted were added.

[root@localhost ~]# ssh root@192.168.152.133
Last login: Wed Jun 18 15:18:18 2025 from 192.168.152.133
(2) 创建存放crontab定时任务日志的文件夹
[root@localhost ~]# mkdir -p /wwq/logs/cron/
(2)设置定时任务并日志存放在指定位置
[root@localhost ~]# crontab -e
*/5 * * * * rsync -avz -e 'ssh' /rsync_server/ root@192.168.152.133:/rsync_client/ >> /wwq/logs/cron/crontab.log 2>&1
(3) 验证

[root@localhost logs]# cat /wwq/logs/cron/crontab.log
sending incremental file list

sent 213 bytes  received 12 bytes  150.00 bytes/sec
total size is 9  speedup is 0.04
[root@localhost logs]# crontab -e
crontab: no changes made to crontab
[root@localhost logs]# cat /wwq/logs/cron/crontab.log
sending incremental file list

sent 213 bytes  received 12 bytes  150.00 bytes/sec
total size is 9  speedup is 0.04
sending incremental file list

sent 213 bytes  received 12 bytes  450.00 bytes/sec
total size is 9  speedup is 0.04
三、nfs:准备两台服务器,一台server端一台client端,在server端将/nfs_server端共享,在client挂载server端的nfs_server目录到/nfs_client目录。 验证:在nfs_client或nfs_server创建一个文件,在另一个目录查看是否共享。
NFS是什么
NFS,全称为Network File System,是一种网络文件系统协议,用于在[计算机网络中实现文件共享。它允许在不同的操作系统之间共享文件和目录,使得在网络中的计算机可以像访问本地文件一样访问远程计算机上的文件。
NFS的工作原理如下:
客户端向服务器发送挂载请求,指定要访问的共享资源的位置。
服务器确认挂载请求,并将共享资源挂载到客户端的文件系统中,使其在客户端上可见。
客户端可以像访问本地文件一样访问挂载的共享资源,可以读取、写入、修改和删除文件。
客户端可以向服务器发送文件操作请求,服务器响应并执行相应的操作。
客户端可以卸载共享资源,从文件系统中移除它。
NFS具有以下特点和优势:
透明性:NFS使得远程文件访问对用户来说是透明的,就像访问本地文件一样,无需了解底层的网络细节。
共享性:NFS允许多个客户端同时访问共享资源,实现文件共享和协作工作。
可靠性:NFS提供了一些机制来确保文件访问的可靠性和完整性,如文件锁定和写入确认等。
性能:NFS在文件访问速度上具有较高的性能,可以通过一些优化技术进一步提高性能,如缓存和预读取等。
server端:192.168.152.131
client端:192.168.152.133
在server端事先创建/nfs_server目录,并在该目录下创建了10个文本文件
[root@localhost ~]# mkdir /nfs_server
[root@localhost ~]# touch /nfs_server/{10..20}.txt
[root@localhost ~]# ls /nfs_server/
10.txt  11.txt  12.txt  13.txt  14.txt  15.txt  16.txt  17.txt  18.txt  19.txt  20.txt
在client端创建/nfs_client目录
[root@localhost yum.repos.d]# mkdir /nfs_client
[root@localhost yum.repos.d]# ls /
bin  boot  dev  etc  home  lib  lib64  media  mnt  opt  proc  root  nfs_client  run  sbin  srv  sys  tmp  usr  var
1.server端安装NFS
[root@localhost ~]# yum -y install nfs-utils
已加载插件:fastestmirror, langpacks
Loading mirror speeds from cached hostfile
epel/x86_64/metalink                                                                                                                  | 4.8 kB  00:00:00
 * base: mirrors.aliyun.com
 * epel: d2lzkl7pfhq30w.cloudfront.net
 * extras: mirrors.aliyun.com
 * updates: mirrors.aliyun.com
base                                                                                                                                  | 3.6 kB  00:00:00
extras                                                                                                                                | 2.9 kB  00:00:00
updates                                                                                                                               | 2.9 kB  00:00:00
正在解决依赖关系
--> 正在检查事务
---> 软件包 nfs-utils.x86_64.1.1.3.0-0.54.el7 将被 升级
---> 软件包 nfs-utils.x86_64.1.1.3.0-0.68.el7.2 将被 更新
--> 解决依赖关系完成

依赖关系解决

=============================================================================================================================================================
 Package                             架构                             版本                                           源                                 大小
=============================================================================================================================================================
正在更新:
 nfs-utils                           x86_64                           1:1.3.0-0.68.el7.2                             updates                           413 k

事务概要
=============================================================================================================================================================
升级  1 软件包

总计:413 k
Downloading packages:
Running transaction check
Running transaction test
Transaction test succeeded
Running transaction
  正在更新    : 1:nfs-utils-1.3.0-0.68.el7.2.x86_64                                                                                                      1/2
  清理        : 1:nfs-utils-1.3.0-0.54.el7.x86_64                                                                                                        2/2
  验证中      : 1:nfs-utils-1.3.0-0.68.el7.2.x86_64                                                                                                      1/2
  验证中      : 1:nfs-utils-1.3.0-0.54.el7.x86_64                                                                                                        2/2

更新完毕:
  nfs-utils.x86_64 1:1.3.0-0.68.el7.2

完毕!
2.server端启动NFS服务
[root@localhost ~]# systemctl start nfs
3.查看是否已经启动
[root@localhost ~]# ps -aux | grep nfs
root      40162  0.0  0.0      0     0 ?        S<   15:38   0:00 [nfsd4_callbacks]
root      40168  0.0  0.0      0     0 ?        S    15:38   0:00 [nfsd]
root      40169  0.0  0.0      0     0 ?        S    15:38   0:00 [nfsd]
root      40170  0.0  0.0      0     0 ?        S    15:38   0:00 [nfsd]
root      40171  0.0  0.0      0     0 ?        S    15:38   0:00 [nfsd]
root      40172  0.0  0.0      0     0 ?        S    15:38   0:00 [nfsd]
root      40173  0.0  0.0      0     0 ?        S    15:38   0:00 [nfsd]
root      40174  0.0  0.0      0     0 ?        S    15:38   0:00 [nfsd]
root      40175  0.0  0.0      0     0 ?        S    15:38   0:00 [nfsd]
root      40255  0.0  0.0 112720   968 pts/1    S+   15:39   0:00 grep --color=auto nfs
注:nfs自己并没有去对外监听某个端口号,而是外包给了rpc服务,rpc帮助nfs去监听端口,然后告诉客户机和本机的那个进程对应的端口连续
4.查看rpc服务相关的端口
[root@localhost ~]# netstat -anplut | grep rpc
tcp        0      0 0.0.0.0:111             0.0.0.0:*               LISTEN      706/rpcbind
tcp        0      0 0.0.0.0:20048           0.0.0.0:*               LISTEN      40158/rpc.mountd
tcp        0      0 0.0.0.0:60051           0.0.0.0:*               LISTEN      40157/rpc.statd
tcp6       0      0 :::34561                :::*                    LISTEN      40157/rpc.statd
tcp6       0      0 :::111                  :::*                    LISTEN      706/rpcbind
tcp6       0      0 :::20048                :::*                    LISTEN      40158/rpc.mountd
udp        0      0 0.0.0.0:40439           0.0.0.0:*                           40157/rpc.statd
udp        0      0 0.0.0.0:20048           0.0.0.0:*                           40158/rpc.mountd
udp        0      0 0.0.0.0:878             0.0.0.0:*                           706/rpcbind
udp        0      0 127.0.0.1:904           0.0.0.0:*                           40157/rpc.statd
udp        0      0 0.0.0.0:111             0.0.0.0:*                           706/rpcbind
udp6       0      0 :::35065                :::*                                40157/rpc.statd
udp6       0      0 :::20048                :::*                                40158/rpc.mountd
udp6       0      0 :::878                  :::*                                706/rpcbind
udp6       0      0 :::111                  :::*                                706/rpcbind
您在 /var/spool/mail/root 中有新邮件
5.编辑共享文件的配置文件
[root@localhost ~]# vim /etc/exports
您在 /var/spool/mail/root 中有新邮件
[root@localhost ~]# cat /etc/exports
/nfs_server 192.168.152.0/24(ro,all_squash,sync)
| 参数 | 释义 |
|---|---|
| /nfs_server | 是我们共享的文件夹的路径–》使用绝对路径 |
| 192.168.152.0/24 | 允许过来访问的客户机的ip地址网段 |
| (ro,all_squash,sync) | 表示权限的限制 |
| rw | 表示可读可写 read and write |
| ro | 表示只能读 read-only |
| all_squash | 任何客户机上的用户过来访问的时候,都把它认为是普通的用户 |
| root_squash | 当NFS客户端以root管理员访问时,映射为NFS服务器匿名用户 |
| no_root_squash | 当NFS客户端以root管理员访问时,映射为NFS服务器的root管理员 |
| sync | 同时将数据写入到内存与硬盘中,保证不丢失数据 |
| async | 优先将数据保存到内存,然后再写入硬盘,效率更高,但可能丢失数据 |
6.刷新输出文件的列表
[root@localhost ~]# exportfs -rv
exporting 192.168.152.0/24:/nfs_server
7.在client端持久化挂载nfs_server端
[root@localhost ~]# vim /etc/fstab

192.168.152.131:/nfs_server  /nfs_client/  nfs  defaults,_netdev  0  0

[root@localhost ~]# mount -a
[root@localhost ~]# df -h
文件系统                     容量  已用  可用 已用% 挂载点
/dev/mapper/centos-root       27G  4.0G   23G   15% /
devtmpfs                     895M     0  895M    0% /dev
tmpfs                        911M     0  911M    0% /dev/shm
tmpfs                        911M   37M  875M    5% /run
tmpfs                        911M     0  911M    0% /sys/fs/cgroup
/dev/sda1                   1014M  170M  845M   17% /boot
tmpfs                        183M  4.0K  183M    1% /run/user/42
tmpfs                        183M   28K  183M    1% /run/user/0
/dev/sr0                     8.8G  8.8G     0  100% /run/media/root/CentOS 7 x86_64
192.168.152.131:/nfs_server   27G  5.1G   22G   19% /nfs_client
| 字段 | 释义 |
|---|---|
| 192.168.152.131:/nfs_server | NFS 服务器地址和共享路径 |
| /nfs_client/ | client端本地挂载点 |
| nfs | 文件系统类型(NFS) |
| defaults,_netdev | 挂载选项:_netdev` 表示等待网络就绪后再挂载 |
| 0 | 不备份(dump 工具忽略) |
| 0 | 不检查文件系统(fsck 忽略) |
8.验证
[root@localhost ~]# ls /nfs_client/
10.txt  11.txt  12.txt  13.txt  14.txt  15.txt  16.txt  17.txt  18.txt  19.txt  20.txt