Nginx Web服务
一、nginx理论: nginx是什么?做什么用的? 反向代理?负载均衡?动静分离?web服务器?
🔹1. Nginx 是什么?
Nginx 是一个开源的 Web 服务器软件,最初由 Igor Sysoev 开发,用于处理高并发连接。以**事件驱动(异步非阻塞)**的架构著称,能够高效地处理大量的并发请求。
🔹2. Nginx 的作用(能做什么)
Nginx 是一把“多面手”,它可以用于:
✅ Web服务器
- 提供静态文件服务(HTML、CSS、JS、图片等)
- 响应客户端请求
✅ 反向代理服务器
- 将客户端请求转发给后端服务器(如 Tomcat、Node.js、Flask 等)
- 客户端并不知道实际提供服务的后端是谁(隐藏内部结构)
✅ 负载均衡器
- Nginx 能将用户请求“分发”给多个后端服务器,起到“分流”作用。
- 常见的负载算法:轮询(round robin)、IP hash、加权轮询等。
✅ 动静分离
- “动”指动态内容(如 PHP、Java 程序输出),“静”指静态文件(图片、视频、HTML等)
- 静态资源由 Nginx 直接处理,动态请求转发给后端应用服务器(如 PHP-FPM)
✅ 缓存服务器
- Nginx 可缓存页面响应,加快响应速度、减轻后端压力。
🔹3. 核心概念解释
| 名称 | 说明 |
|---|---|
| Web服务器 | 直接响应浏览器请求、提供网页内容 |
| 反向代理 | 用户请求先到 Nginx,由它转发到后端服务器 |
| 负载均衡 | 多台后端机器之间平均分配请求负载 |
| 动静分离 | 静态资源由 Nginx 直接提供,动态请求转发给应用处理 |
二、二进制安装nginx
1、先创建存放nginx安装包目录
[root@localhost ~]# mkdir -p /soft/nginx
[root@localhost ~]# cd /soft/nginx/
[root@localhost nginx]#
2、下载nginx安装包,并安装相应的依赖项
[root@localhost nginx]# wget http://nginx.org/download/nginx-1.16.1.tar.gz
[root@localhost nginx]# yum -y install gcc c++ pcre pcre-devel zlib zlib-devel openssl openssl-devel
3、解压并进入目录
[root@localhost nginx]# tar -xzvf nginx-1.16.1.tar.gz nginx-1.16.1
[root@localhost nginx]# cd nginx-1.16.1/
[root@localhost nginx-1.16.1]#
4、编译并且安装nginx,–prefix为安装目录,使用绝对路径
[root@localhost nginx-1.16.1]# mkdir -p /wwq/packages/nginx    #创建安装目录
[root@localhost nginx-1.16.1]# ./configure --prefix=/wwq/packages/nginx/
[root@localhost nginx-1.16.1]# make && make install
5、进入安装目录,启动nginx
[root@localhost nginx-1.16.1]# cd /wwq/packages/nginx/sbin/
[root@localhost nginx]# ./nginx
6、验证nginx版本,和查看是否正在运行,也可以通过http://IP地址访问查看是否正常
[root@localhost sbin]# ./nginx -v
nginx version: nginx/1.16.1
[root@localhost sbin]# ps -ef | grep nginx
root     106729      1  0 16:53 ?        00:00:00 nginx: master process ./nginx
nobody   106730 106729  0 16:53 ?        00:00:00 nginx: worker process
root     106776  76945  0 16:54 pts/3    00:00:00 grep --color=auto nginx
安装目录文件说明
conf 						# 所有配置⽂件⽬录
	nginx.conf 				# 默认的主要的配置⽂件
	nginx.conf.default      # 默认配置模板
html 						# 这是编译安装时Nginx的默认站点⽬录
	50x.html 				# 错误⻚⾯
	index.html 				# 默认⾸⻚
logs 						# nginx默认的⽇志路径,包括错误⽇志及访问⽇志
	access.log 				# nginx访问⽇志
	error.log		 		# 错误⽇志
	nginx.pid 				# nginx启动后的进程id
sbin 						# nginx命令的⽬录
	nginx 					# 执行文件
7、创建nginx守护进程文件
创建后,可以通过systemctl命令管理nginx服务。
[root@localhost sbin]# vim /etc/systemd/system/nginx.service
#输入以下内容
[Unit]
Description=nginx
After=network.target

[Service]
Type=forking
ExecStart=/wwq/packages/nginx/sbin/nginx
ExecReload=/wwq/packages/nginx/sbin/nginx -s reload
ExecStop=/wwq/packages/nginx/sbin/nginx -s quit
PrivateTmp=true

[Install]
WantedBy=multi-user.target

#启动nginx服务,需要先停止之前./nginx的进程
[root@docker nginx]# systemctl start nginx
8.验证
切记:关闭服务器的防火墙和SELinux
[root@localhost sbin]# systemctl stop firewalld
[root@localhost sbin]# setenforce 0
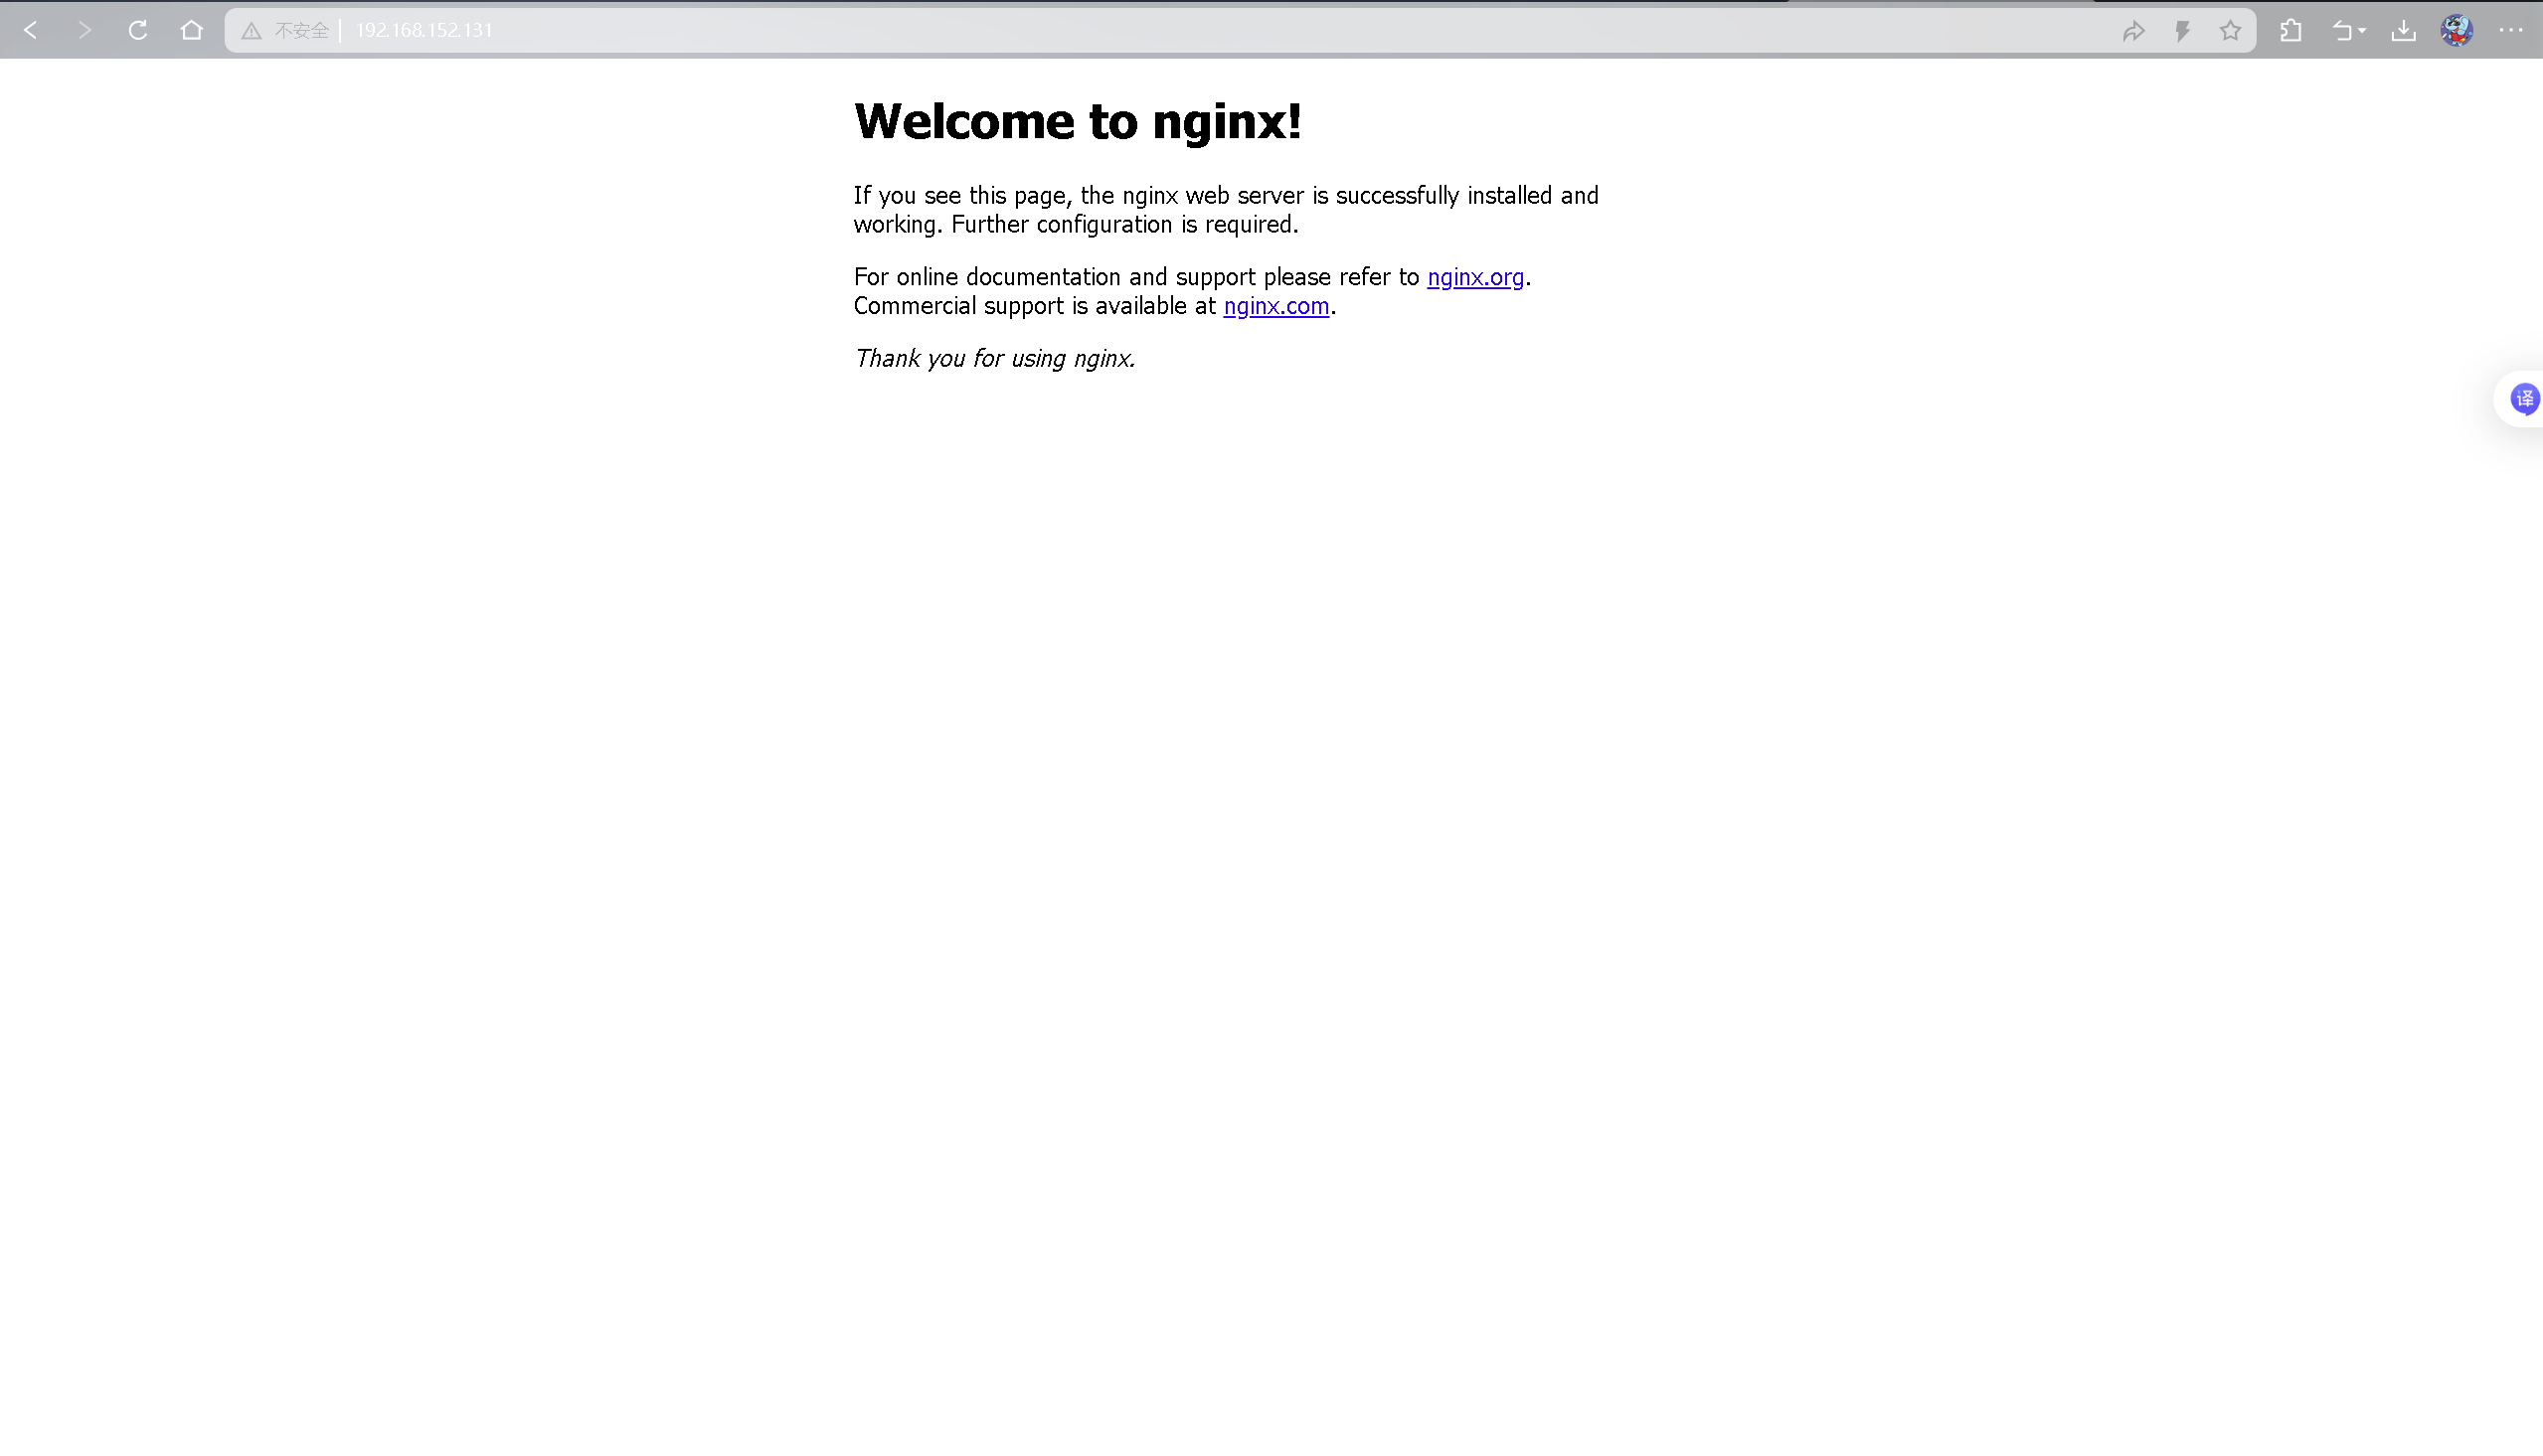
查看监听端口并在宿主机浏览器中访问192.168.152.131的nginx服务
[root@localhost sbin]# ss -tlnp | grep nginx
LISTEN     0      128          *:80                       *:*                   users:(("nginx",pid=107233,fd=6),("nginx",pid=107232,fd=6))

#本机验证
[root@localhost sbin]# curl 127.0.0.1
<!DOCTYPE html>
<html>
<head>
<title>Welcome to nginx!</title>
<style>
    body {
        width: 35em;
        margin: 0 auto;
        font-family: Tahoma, Verdana, Arial, sans-serif;
    }
</style>
</head>
<body>
<h1>Welcome to nginx!</h1>
<p>If you see this page, the nginx web server is successfully installed and
working. Further configuration is required.</p>

<p>For online documentation and support please refer to
<a href="http://nginx.org/">nginx.org</a>.<br/>
Commercial support is available at
<a href="http://nginx.com/">nginx.com</a>.</p>

<p><em>Thank you for using nginx.</em></p>
</body>
</html>
宿主机验证
三、整理nginx的conf配置文件,参数含义。
[root@localhost conf]# cat nginx.conf

#user  nobody;  # user:指定nginx工作进程运行的系统用户。默认注释,nginx以当前用户运行。通常设为nginx或www-data。
worker_processes  1;   # worker_processes:Nginx工作进程数量。一般建议设置为CPU核心数,这里设置为1,表示只启动一个工作进程。

#error_log  logs/error.log;
#error_log  logs/error.log  notice;
#error_log  logs/error.log  info;

#pid        logs/nginx.pid;

# events 模块
# worker_connections:每个worker进程最大并发连接数。理论最大连接数为worker_processes * worker_connections。1024表示每个进程最多处理1024个连接。
events {
    worker_connections  1024;
}


# http 模块
http {
    include       mime.types;
    # include mime.types:导入 MIME 类型映射文件,根据文件后缀设置响应的 Content-Type。
    default_type  application/octet-stream;
    # default_type:默认的内容类型,当找不到对应的 MIME 类型时使用。

    #log_format  main  '$remote_addr - $remote_user [$time_local] "$request" '
    #                  '$status $body_bytes_sent "$http_referer" '
    #                  '"$http_user_agent" "$http_x_forwarded_for"';
	# log_format:定义访问日志的格式,内容包括客户端IP、请求时间、状态码等。这里注释掉了,默认无自定义日志格式。

    #access_log  logs/access.log  main;
	# access_log:访问日志路径和格式,注释掉表示不写访问日志。

    sendfile        on;
    # sendfile:启用高效文件传输机制,利用操作系统零拷贝(zero-copy),提升静态文件传输效率。建议开启。
    #tcp_nopush     on;
	# tcp_nopush:TCP套接字优化,减少TCP包的数量,提升发送性能。注释未启用。

    #keepalive_timeout  0;
    keepalive_timeout  65;
    # keepalive_timeout:保持长连接的超时时间,单位秒。65秒表示客户端在65秒内无请求时断开连接。注释掉0(禁用长连接),启用了65秒。

    #gzip  on;
    # gzip:启用gzip压缩响应,减少传输内容大小,提高访问速度。此处注释,未启用。

	# server 模块
    server {
        listen       80;
        # listen 80:监听80端口,HTTP默认端口。
        server_name  localhost;
        # server_name localhost:服务器域名,匹配客户端请求的主机名。此处仅匹配localhost。

        #charset koi8-r;

        #access_log  logs/host.access.log  main;

        location / {
            root   html;
            index  index.html index.htm;
        }
        # location /:根路径匹配,处理所有请求。
        # root html:网站根目录,实际路径为<nginx安装目录>/html。
        # index index.html index.htm:默认首页文件,按顺序查找。

        #error_page  404              /404.html;

        # redirect server error pages to the static page /50x.html
        #
        error_page   500 502 503 504  /50x.html;
        location = /50x.html {
            root   html;
        }
        # error_page 500 502 503 504 /50x.html:当服务器返回这几个错误码时,重定向到/50x.html页面。
        # location = /50x.html:精确匹配/50x.html请求,文件存放在html目录。


        # proxy the PHP scripts to Apache listening on 127.0.0.1:80
        #
        #location ~ .php$ {
        #    proxy_pass   http://127.0.0.1;
        #}
        # 用于将 .php 请求代理转发到本地Apache服务器,注释未启用。

        # pass the PHP scripts to FastCGI server listening on 127.0.0.1:9000
        #
        #location ~ .php$ {
        #    root           html;
        #    fastcgi_pass   127.0.0.1:9000;
        #    fastcgi_index  index.php;
        #    fastcgi_param  SCRIPT_FILENAME  /scripts$fastcgi_script_name;
        #    include        fastcgi_params;
        #}
        # FastCGI配置示例,将PHP请求转发给FastCGI服务(如php-fpm)。注释未启用。

        # deny access to .htaccess files, if Apache's document root
        # concurs with nginx's one
        #
        #location ~ /.ht {
        #    deny  all;
        #}
        # 拒绝访问以 .ht 开头的文件(如 .htaccess),防止泄漏Apache配置文件。注释未启用。
    }


    # another virtual host using mix of IP-, name-, and port-based configuration
    #
    #server {
    #    listen       8000;
    #    listen       somename:8080;
    #    server_name  somename  alias  another.alias;

    #    location / {
    #        root   html;
    #        index  index.html index.htm;
    #    }
    #}


    # HTTPS server
    #
    #server {
    #    listen       443 ssl;
    #    server_name  localhost;

    #    ssl_certificate      cert.pem;
    #    ssl_certificate_key  cert.key;

    #    ssl_session_cache    shared:SSL:1m;
    #    ssl_session_timeout  5m;

    #    ssl_ciphers  HIGH:!aNULL:!MD5;
    #    ssl_prefer_server_ciphers  on;

    #    location / {
    #        root   html;
    #        index  index.html index.htm;
    #    }
    #}

}
四、nginx配置实例-反向代理:访问nginx,代理跳转到另一个实例,实验案例:搭建一个 Nginx 实例(称为 nginx1)作为反向代理,用户访问 nginx1 时,请求将被代理转发到另一个后端实例(如 nginx2)。这用于隐藏真实后端地址,统一访问入口。
nginx1(反向代理):192.168.152.131
nginx2(后端服务器):192.168.152.133
安装nginx步骤参考二,此处跳过
1.修改nginx1的nginx.conf配置文件
[root@nginx1 conf]# vim /wwq/packages/nginx/conf/nginx.conf

    server {
        listen       80;
        server_name  localhost;

        #charset koi8-r;

        #access_log  logs/host.access.log  main;

        location / {
            proxy_pass http://192.168.152.133;   #加入后端服务器的ip
            root   html;
            index  index.html index.htm;
        }

        #error_page  404              /404.html;

        # redirect server error pages to the static page /50x.html
        #
        error_page   500 502 503 504  /50x.html;
        location = /50x.html {
            root   html;
        }
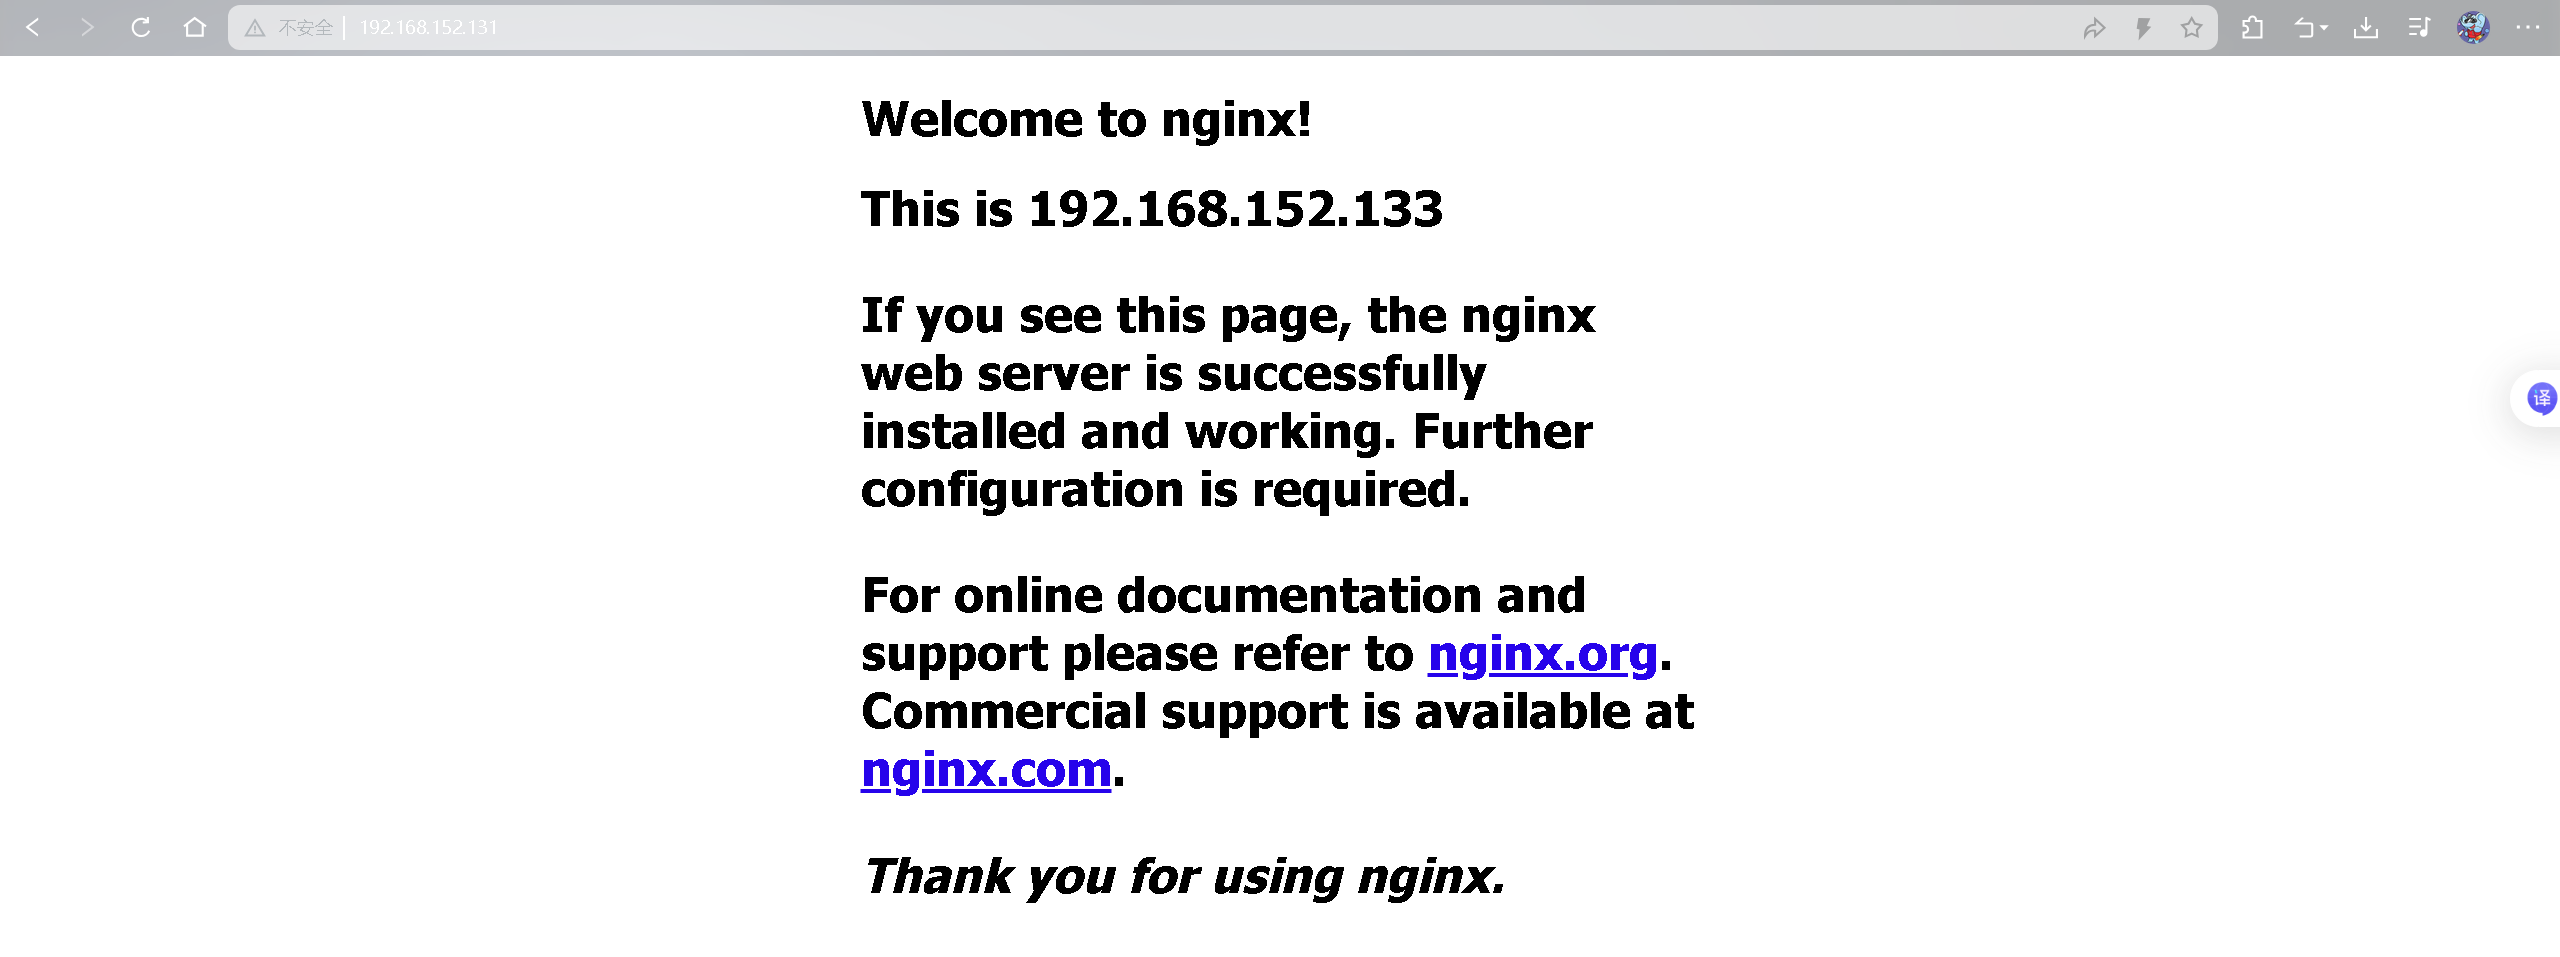
2.修改nginx2的访问首页信息,以便验证反向代理服务器是否正常工作
[root@nginx2 sbin]# vim /wwq/packages/nginx/html/index.html

#加入下面内容
<h1>This is 192.168.152.133<h1>

[root@nginx2 sbin]# systemctl restart nginx
3.通过宿主机访问反向代理服务器192.168.152.131验证
五、nginx配置实例-负载均衡:访问nginx,代理跳转到后端的两个应用,实验案例:搭建一个 Nginx(称为 nginx1)作为反向代理服务器,实现负载均衡,将请求转发到两个后端 Nginx 服务(nginx2 和 nginx3)。用户访问 nginx1 时,请求会按轮询策略分发到 nginx2 和 nginx3。
nginx1(反向代理):192.168.152.131
nginx2(后端服务器):192.168.152.133
nginx3(后端服务器):192.168.152.134
安装nginx步骤参考二,此处跳过
1.修改nginx1的nginx.conf配置文件
[root@nginx1 conf]# cat nginx.conf

#user  nobody;
worker_processes  1;

#error_log  logs/error.log;
#error_log  logs/error.log  notice;
#error_log  logs/error.log  info;

#pid        logs/nginx.pid;


events {
    worker_connections  1024;
}


http {
    upstream backend_pool {
    server 192.168.152.133;
    server 192.168.152.134;
    }

    include       mime.types;
    default_type  application/octet-stream;

    #log_format  main  '$remote_addr - $remote_user [$time_local] "$request" '
    #                  '$status $body_bytes_sent "$http_referer" '
    #                  '"$http_user_agent" "$http_x_forwarded_for"';

    #access_log  logs/access.log  main;

    sendfile        on;
    #tcp_nopush     on;

    #keepalive_timeout  0;
    keepalive_timeout  65;

    #gzip  on;

    server {
        listen       80;
        server_name  localhost;

        #charset koi8-r;

        #access_log  logs/host.access.log  main;

        location / {
        proxy_pass http://backend_pool;
        proxy_set_header Host $host;
        proxy_set_header X-Real-IP $remote_addr;
        proxy_set_header X-Forwarded-For $proxy_add_x_forwarded_for;
        proxy_set_header X-Forwarded-Proto $scheme;
        }


        #error_page  404              /404.html;

        # redirect server error pages to the static page /50x.html
        #
        error_page   500 502 503 504  /50x.html;
        location = /50x.html {
            root   html;
        }

        # proxy the PHP scripts to Apache listening on 127.0.0.1:80
        #
        #location ~ .php$ {
        #    proxy_pass   http://127.0.0.1;
        #}

        # pass the PHP scripts to FastCGI server listening on 127.0.0.1:9000
        #
        #location ~ .php$ {
        #    root           html;
        #    fastcgi_pass   127.0.0.1:9000;
        #    fastcgi_index  index.php;
        #    fastcgi_param  SCRIPT_FILENAME  /scripts$fastcgi_script_name;
        #    include        fastcgi_params;
        #}

        # deny access to .htaccess files, if Apache's document root
        # concurs with nginx's one
        #
        #location ~ /.ht {
        #    deny  all;
        #}
    }


    # another virtual host using mix of IP-, name-, and port-based configuration
    #
    #server {
    #    listen       8000;
    #    listen       somename:8080;
    #    server_name  somename  alias  another.alias;

    #    location / {
    #        root   html;
    #        index  index.html index.htm;
    #    }
    #}


    # HTTPS server
    #
    #server {
    #    listen       443 ssl;
    #    server_name  localhost;

    #    ssl_certificate      cert.pem;
    #    ssl_certificate_key  cert.key;

    #    ssl_session_cache    shared:SSL:1m;
    #    ssl_session_timeout  5m;

    #    ssl_ciphers  HIGH:!aNULL:!MD5;
    #    ssl_prefer_server_ciphers  on;

    #    location / {
    #        root   html;
    #        index  index.html index.htm;
    #    }
    #}

}
2.修改nginx2和nginx3首页
nginx2
[root@nginx2 sbin]# vim /wwq/packages/nginx/html/index.html
[root@nginx2 sbin]# cat /wwq/packages/nginx/html/index.html
<h1>Hello from nginx2 (192.168.152.133)</h1>
[root@nginx2 sbin]# systemctl restart nginx
nginx3
[root@nginx3 ~]# vim /wwq/packages/nginx/html/index.html
[root@nginx3 ~]# cat /wwq/packages/nginx/html/index.html
<h1>Hello from nginx3 (192.168.152.134)</h1>
[root@nginx3 ~]# systemctl restart nginx
3.验证


六、nginx配置实例-web服务器前端部署:找一个前端代码部署到nginx(gitee、github都可以)
目前nginx1是代理服务器,nginx2和nginx3是web服务器,下面配置使用nginx2来演示,前端代码使用的web课程的期末大作业
1.删除nginx2默认的网站页面
[root@nginx2 ~]# cd /wwq/packages/nginx/html/
[root@nginx2 html]# ls
50x.html  index.html
[root@nginx2 html]# rm -rf *
2.将前端代码通过xshell传入nginx2中
[root@nginx2 html]# ls
韦文琦2021531118web期末.zip
3.解压文件
[root@nginx2 html]# unzip 韦文琦2021531118web期末.zip
[root@nginx2 html]# ls
css            img         photo.html     school.html  韦文琦2021531118web期末.zip
font           index.html  poetry.html    video
hometown.html  js          register.html  watch.html
4.重启nginx2的nginx服务
[root@nginx2 html]# systemctl restart nginx
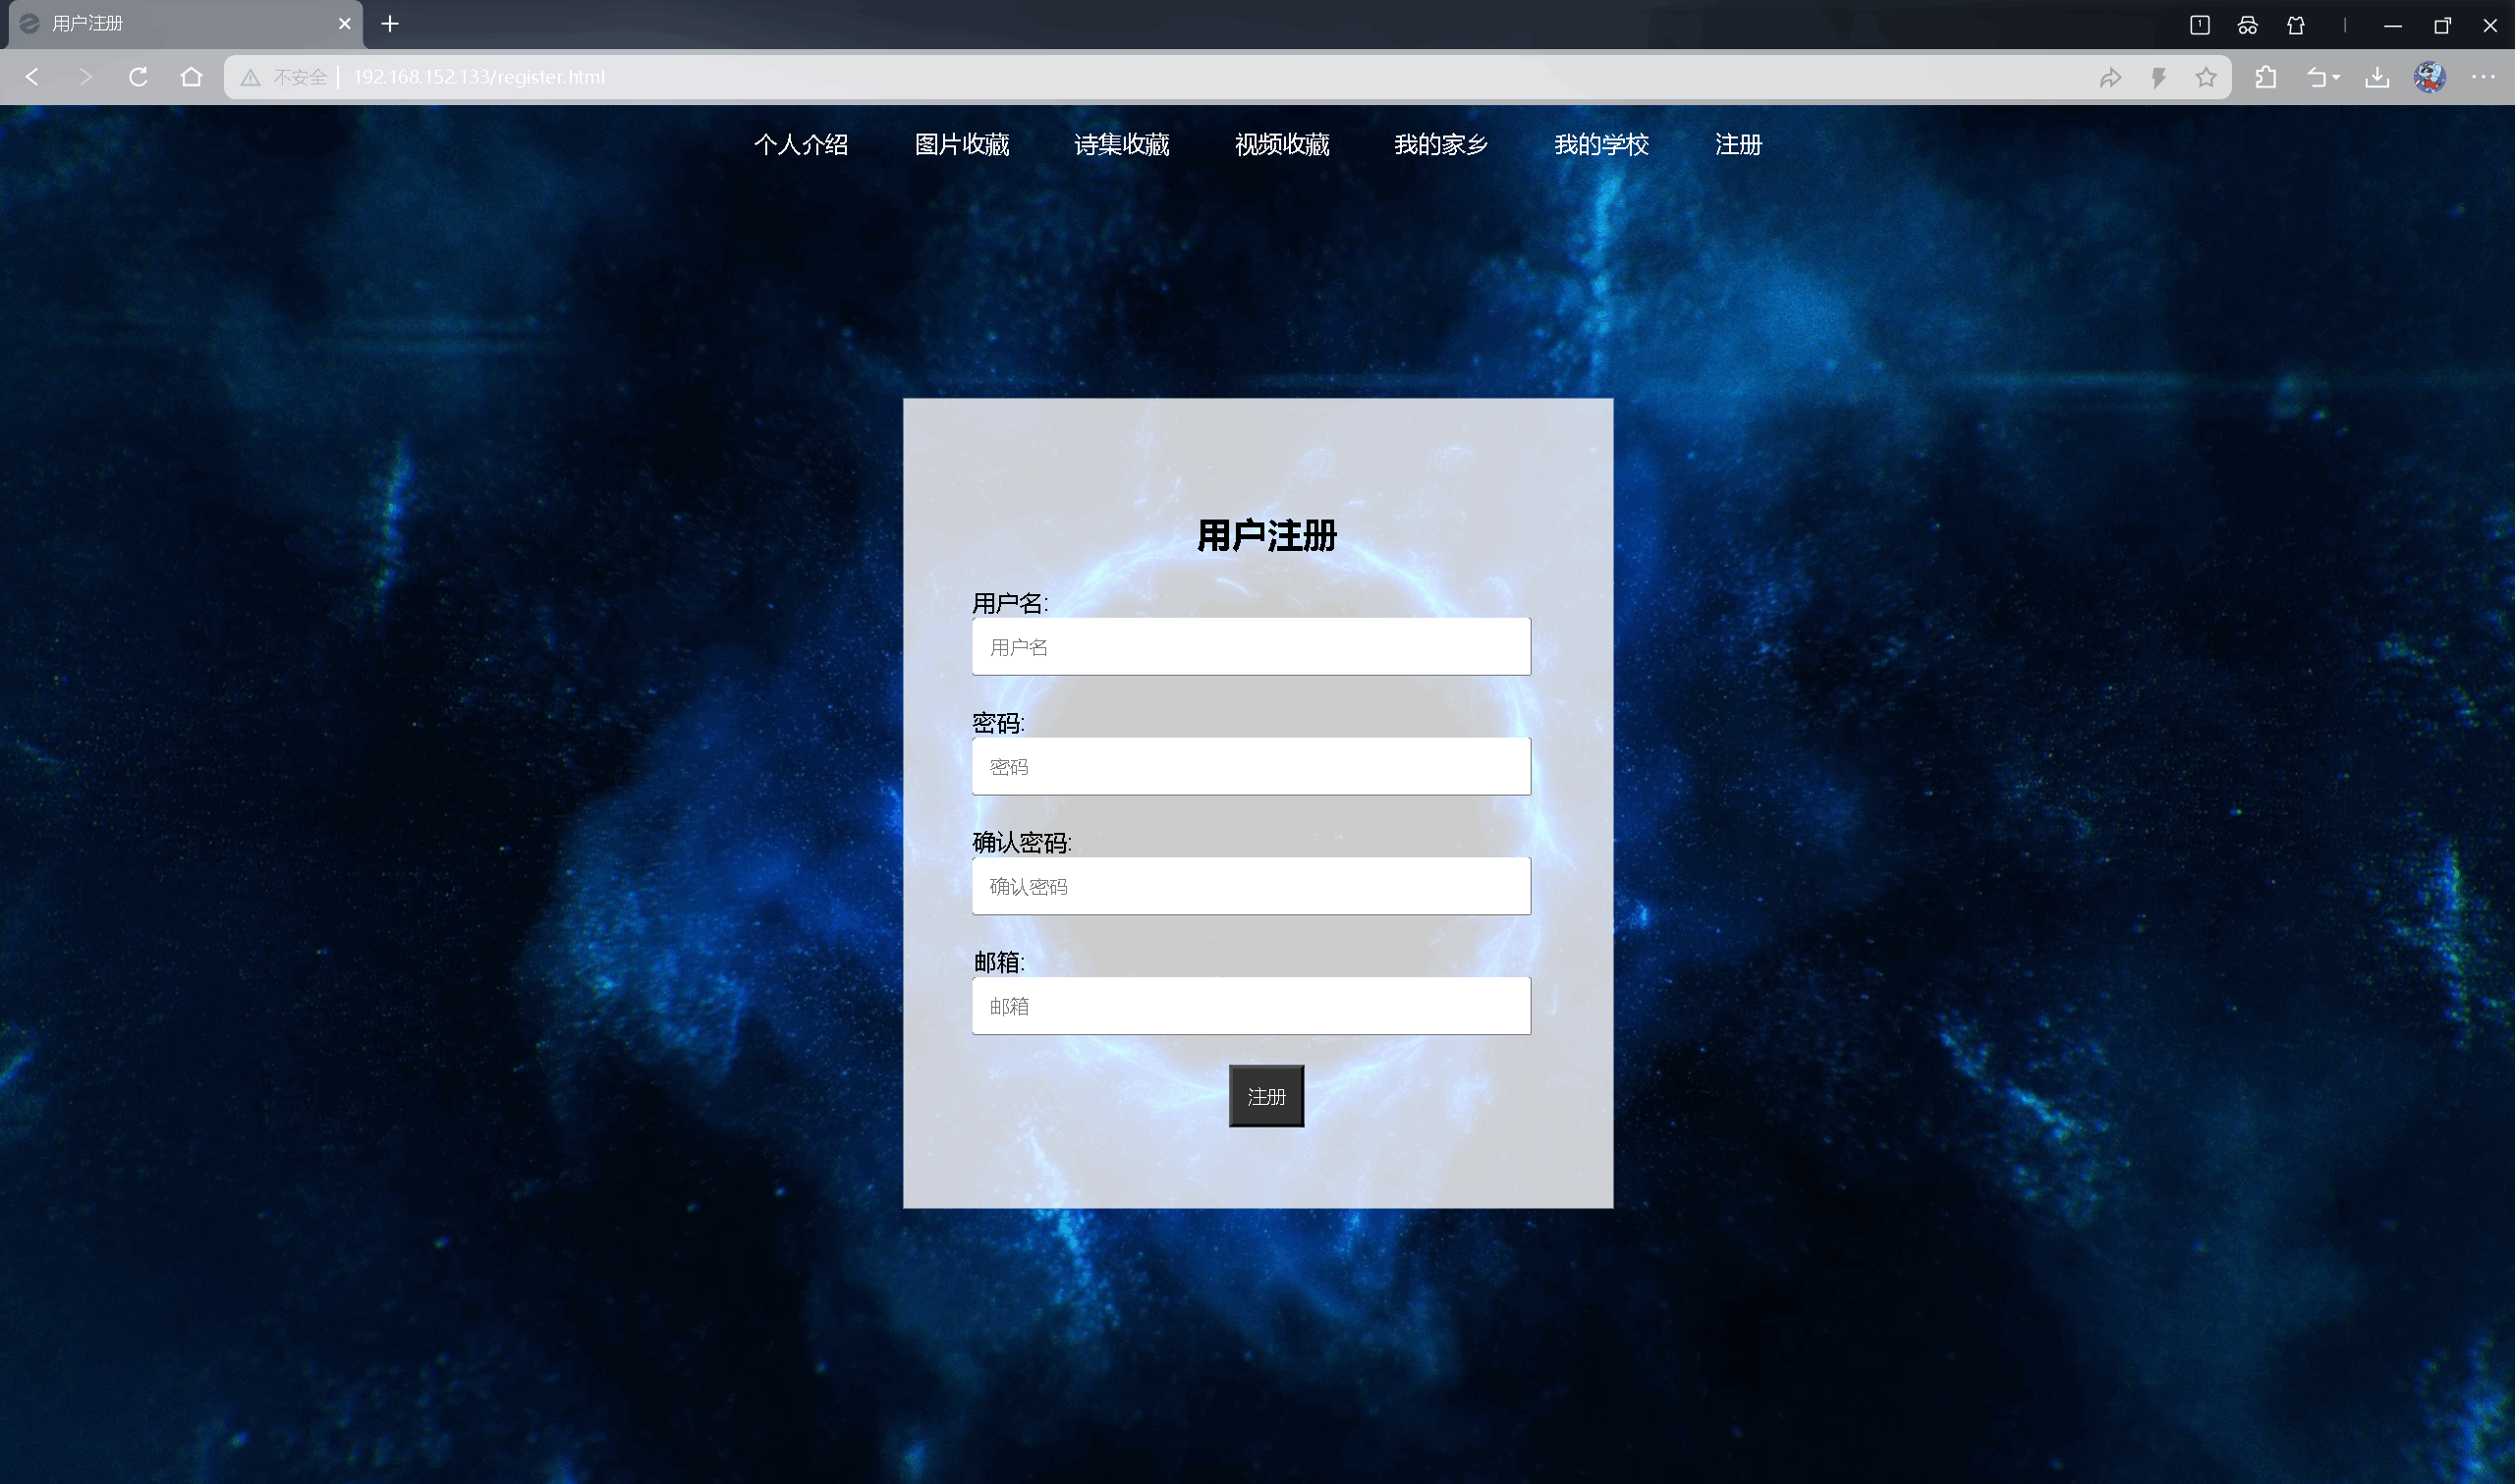
5.验证
浏览器访问nginx2的ip:192.168.152.133,页面全部正常


七、nginx配置实例-ssl:结合《六》做https
由于《六》二进制安装的没有包含SSL模块,所以需要删除原来的版本,保留前端内容。
检查
[root@nginx2 sbin]# ./nginx -V
如果没出现 configure arguments: –with-http_ssl_module 说明没有安装。
1.删除不包含SSL模块的nginx版本
[root@nginx2 ~]# cd /wwq/packages/nginx/
[root@nginx2 nginx]# cp -r ./html/  /wwq/packages/
[root@nginx2 nginx]# cd ~
[root@nginx2 ~]# systemctl stop nginx
[root@nginx2 ~]# rm -rf /wwq/packages/nginx/
2.安装依赖环境
[root@nginx2 sbin]# yum -y install gcc c++ pcre pcre-devel zlib zlib-devel openssl openssl-devel
3.重新安装包含SSL模块的nginx
[root@nginx2 ~]# cd /soft/nginx/nginx-1.16.1/
[root@nginx2 nginx-1.16.1]# ./configure --prefix=/wwq/packages/nginx/ --with-http_ssl_module
[root@nginx2 nginx-1.16.1]# make && make install

[root@nginx2 nginx-1.16.1]# cd /wwq/packages/
[root@nginx2 packages]# ls
html  nginx
[root@nginx2 packages]# rm -rf /wwq/packages/nginx/html/
[root@nginx2 packages]# mv ./html/ /wwq/packages/nginx/html/
[root@nginx2 packages]# ls /wwq/packages/nginx/
client_body_temp  conf  fastcgi_temp  html  logs  proxy_temp  sbin  scgi_temp  uwsgi_temp
4.启动nginx服务
[root@nginx2 packages]# systemctl start nginx
5.查看nginx模块
[root@nginx2 sbin]# ./nginx -V
nginx version: nginx/1.16.1
built by gcc 4.8.5 20150623 (Red Hat 4.8.5-44) (GCC)
built with OpenSSL 1.0.2k-fips  26 Jan 2017
TLS SNI support enabled
configure arguments: --prefix=/wwq/packages/nginx/ --with-http_ssl_module
6.部署 ssl 证书
步骤1:创建服务器私钥
[root@nginx2 conf]# openssl genrsa -des3 -out server.key 1024
Generating RSA private key, 1024 bit long modulus
..........++++++
...........++++++
e is 65537 (0x10001)
Enter pass phrase for server.key:   #root
Verifying - Enter pass phrase for server.key:   #root
| 参数 | 含义 |
|---|---|
openssl |
OpenSSL 工具,用于加密、证书生成等 |
genrsa |
生成 RSA 私钥 |
-des3 |
用 Triple-DES 算法对私钥加密(加密保护,需要输入密码) |
-out server.key |
指定输出文件名为 server.key |
1024 |
私钥长度为 1024 位(现在推荐用 2048 或 4096) |
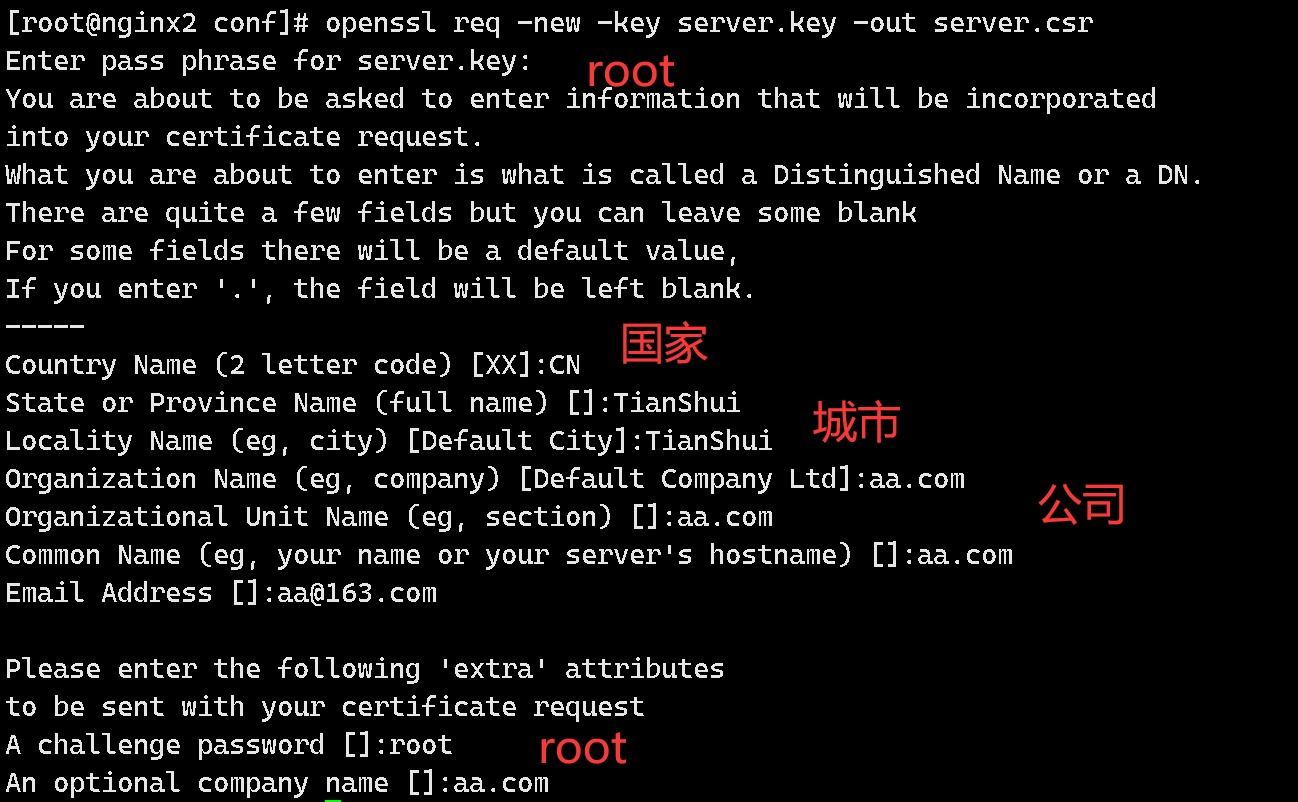
步骤2:创建签名请求的证书(CSR)
使用私钥 server.key 生成一个证书签名请求(CSR)文件 server.csr,用于申请 SSL 证书。
[root@nginx2 conf]# openssl req -new -key server.key -out server.csr
#根据提示,输入信息,最终会得到2个文件,csr和key
[root@nginx2 conf]# openssl req -new -key server.key -out server.csr

步骤3:加载SSL支持的Nginx并使用私钥时去除口令
[root@nginx2 conf]# cp server.key server.key.bak   #备份key文件
[root@nginx2 conf]# openssl rsa -in server.key.bak -out server.key
Enter pass phrase for server.key.bak:
writing RSA key
输入刚才设置的密码:root
| 参数 | 含义 |
|---|---|
openssl |
使用 OpenSSL 工具 |
rsa |
表示操作 RSA 私钥(如查看、转换、去除密码等) |
-in server.key.bak |
输入的私钥文件是带密码的 server.key.bak(你之前生成的) |
-out server.key |
输出一个新的 无密码私钥,保存为 server.key,便于自动化使用 |
步骤4:将密钥文件移动到Nginx配置文件目录下,后续操作切换为conf目录下执行命令。
必须要将server.key server.csr移动到nginx的conf目录下
我从开始就已经进入Nginx配置文件目录下了,此步骤跳过
步骤5:自动签发证书,获取CRT文件
[root@nginx2 conf]# openssl x509 -req -days 10240 -in server.csr -signkey server.key -out server.crt
Signature ok
subject=/C=CN/ST=TianShui/L=TianShui/O=aa.com/OU=aa.com/CN=aa.com/emailAddress=aa@163.com
Getting Private key
| 参数 | 说明 |
|---|---|
openssl x509 |
使用 OpenSSL 的 X.509 证书模块(用于生成或查看证书) |
-req |
表示以证书签名请求(CSR)为基础生成证书 |
-days 10240 |
证书有效期 10240 天(大约 28 年,测试环境可以,正式环境不建议这么久) |
-in server.csr |
输入文件是之前你生成的 CSR 请求 |
-signkey server.key |
用你的私钥对证书进行签名(自签) |
-out server.crt |
输出生成的证书文件 |
7.修改Nginx配置文件,启用HTTPS模块。
[root@nginx2 conf]# vim nginx.conf
#取消这面server模块的注释
8.重启nginx并验证
[root@nginx2 conf]# systemctl restart nginx
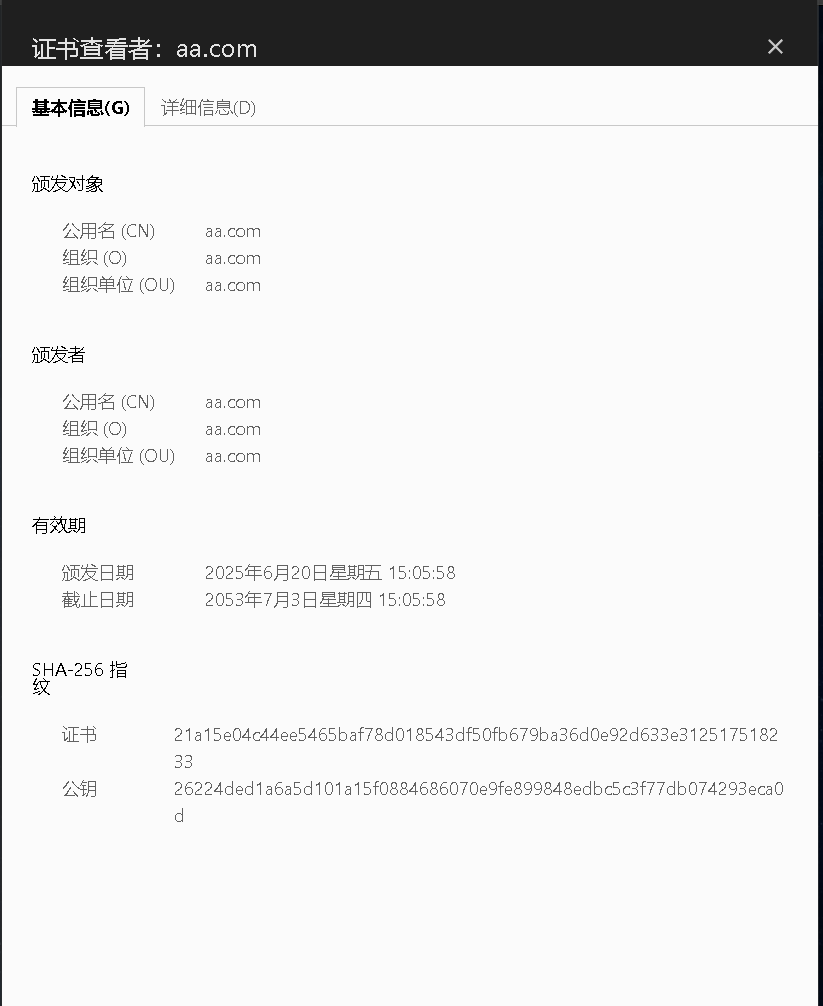
由于自签名证书(不是由受信任机构颁发),而不是像 Let’s Encrypt、阿里云、腾讯云等受信任 CA 签发的证书。

点击继续前往
查看证书
八、nginx配置实例-缓存服务:结合《六》做proxy_cache
浏览器缓存
1.修改配置文件
[root@nginx2 conf]# vim nginx.conf
worker_processes 1;
events {
worker_connections 1024;
}
http {
include mime.types;
default_type application/octet-stream;
sendfile on;
keepalive_timeout 65;
# HTTP 服务器
server {
listen 80;
server_name 192.168.152.133;
location ~* .(js|css|png|jpg|jpeg|gif|ico|woff|woff2|ttf|svg)$ {
root /var/www/static;
expires 30d;
add_header Cache-Control "public";
access_log off;
try_files $uri =404;
}
location / {
root /var/www/static;
index index.html index.htm;
try_files $uri $uri/ /index.html;
}
error_page 404 /404.html;
location = /404.html {
root /var/www/static;
internal;
}
}
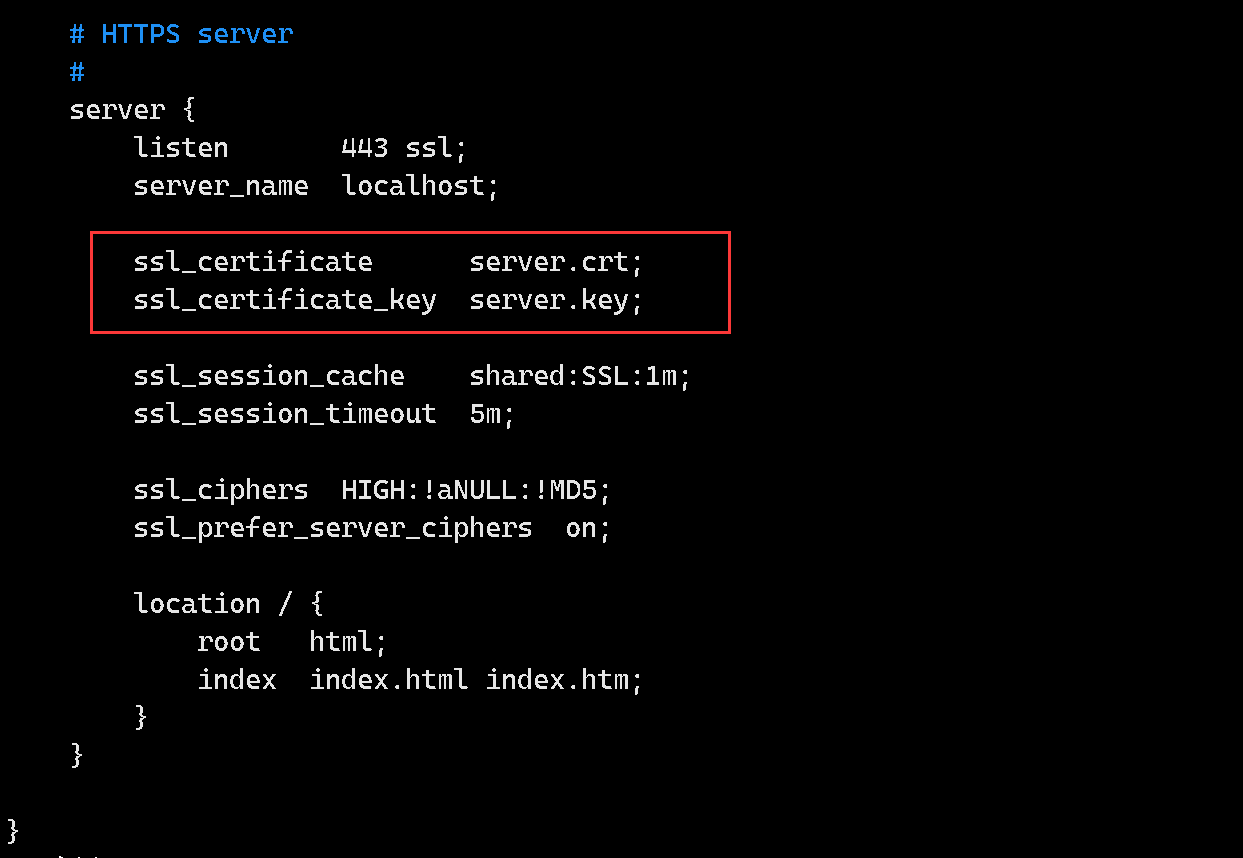
# HTTPS 服务器
server {
listen 443 ssl;
server_name localhost;
ssl_certificate server.crt;
ssl_certificate_key server.key;
ssl_session_cache shared:SSL:1m;
ssl_session_timeout 5m;
ssl_ciphers HIGH:!aNULL:!MD5;
ssl_prefer_server_ciphers on;
location ~* .(js|css|png|jpg|jpeg|gif|ico|woff|woff2|ttf|svg)$ {
root /var/www/static;
expires 30d;
add_header Cache-Control "public";
access_log off;
try_files $uri =404;
}
location / {
root /var/www/static;
index index.html index.htm;
try_files $uri $uri/ /index.html;
}
error_page 404 /404.html;
location = /404.html {
root /var/www/static;
internal;
}
}
}
| 参数 | 含义 |
|---|---|
/wwq/cache/static |
实际用于存储缓存文件的物理路径(需要你手动创建) |
levels=1:2 |
子目录层级结构,用于避免单目录文件太多,提升文件系统性能 |
keys_zone=static_cache:10m |
创建名为 static_cache 的共享内存区域,10MB 用于缓存键索引 |
inactive=60m |
如果某缓存项 60 分钟内没有被访问,则会被自动清除(并非立即删除,而是触发清理时被淘汰) |
max_size=1g |
缓存最大占用磁盘空间,超过此值会按照 LRU 策略淘汰旧缓存 |
2.创建缓存文件夹
[root@nginx2 conf]# mkdir -p /var/www/static
3.把需要缓存的文件放到缓存文件下
[root@nginx2 ~]# cd /wwq/packages/nginx/html/
[root@nginx2 html]# ls
css  font  hometown.html  img  index.html  js  photo.html  poetry.html  register.html  school.html  video  watch.html  韦文琦2021531118web期末.zip
[root@nginx2 html]# cp 韦文琦2021531118web期末.zip /var/www/static/
[root@nginx2 html]# cd /var/www/static/
[root@nginx2 static]# unzip 韦文琦2021531118web期末.zip
4.重启服务
[root@nginx2 conf]# systemctl restart nginx
5.验证
[root@nginx2 conf]# curl -I http://192.168.152.133/img/收藏图1.jpg
HTTP/1.1 200 OK
Server: nginx/1.16.1
Date: Mon, 23 Jun 2025 02:11:39 GMT
Content-Type: image/jpeg
Content-Length: 212094
Last-Modified: Fri, 29 Dec 2023 02:35:24 GMT
Connection: keep-alive
ETag: "658e306c-33c7e"
Expires: Wed, 23 Jul 2025 02:11:39 GMT
Cache-Control: max-age=2592000
Cache-Control: public
Accept-Ranges: bytes
九、nginx配置优化:如何优化nginx?
1.调整Nginx核心配置
1.1 Worker进程数
根据CPU核心数设置(通常等于核心数):
worker_processes 4; # 4核CPU
1.2 连接数与事件模型
worker_connections 16384;  # 单进程最大连接数

use epoll;  # Linux下高效事件模型

multi_accept on;  # 一次事件处理多个连接
2.启用高效传输协议
2.1 HTTP/2支持
listen 443 ssl http2;  # 开启HTTPS+HTTP/2

ssl_protocols TLSv1.3 TLSv1.2;  # 优先最新协议
2.2 TCP Fast Open
tcp_fastopen on; # 减少TCP三次握手延迟
3.开启缓存加速
3.1 静态文件缓存
location /static/ {

    root /var/www;
    expires 7d;  # 缓存7天
    add_header Cache-Control "public, immutable";
}
3.2 反向代理缓存
proxy_cache_path /var/nginx/cache levels=1:2 keys_zone=mycache:100m max_size=1g;

location /api/ {

    proxy_pass http://backend;
    proxy_cache mycache;
    proxy_cache_valid 200 302 1h;  # 缓存200/302状态码1小时
}
4.压缩优化
4.1 Gzip压缩
gzip on;

gzip_comp_level 5;  # 压缩级别1-9(默认6)

gzip_types text/plain text/css application/javascript;  # 仅压缩文本类文件

gzip_vary on;  # 让CDN识别压缩状态
4.2 Brotli压缩(需安装ngx_brotli模块)
brotli on;

brotli_comp_level 5;

brotli_types text/plain text/css application/javascript;
5.优化负载均衡
upstream backend {

    server 192.168.1.1 weight=3;  # 权重分配
    server 192.168.1.2 weight=2;
    keepalive 32;  # 保持32个空闲连接
}


location / {

    proxy_pass http://backend;
    proxy_http_version 1.1;
    proxy_set_header Connection "";  # 关闭代理层的Connection头
}
6.硬件相关优化
6.1 调整内核参数(/etc/sysctl.conf):
net.core.somaxconn = 32768  # 监听队列长度

net.ipv4.tcp_tw_reuse = 1  # 复用TIME_WAIT连接

fs.file-max = 1048576  # 最大文件句柄数
执行 sysctl -p 生效。
7.减少日志开销
access_log /var/log/nginx/access.log combined buffer=64k;  # 缓冲写日志

error_log /var/log/nginx/error.log crit;  # 仅记录严重错误
8.监控与调优工具
Nginx状态页:
location /nginx_status {
    stub_status on;
    allow 127.0.0.1;
    deny all;
}
总结:优化需结合业务场景,建议按以下顺序操作:
① 基础配置 → ② 缓存压缩 → ③ 协议升级 → ④ 负载均衡 → ⑤ 硬件调优。每步修改后通过 nginx -s reload 生效,并用压测工具验证效果。
十、nginx日志自定义:如自定义日志路径,日志格式
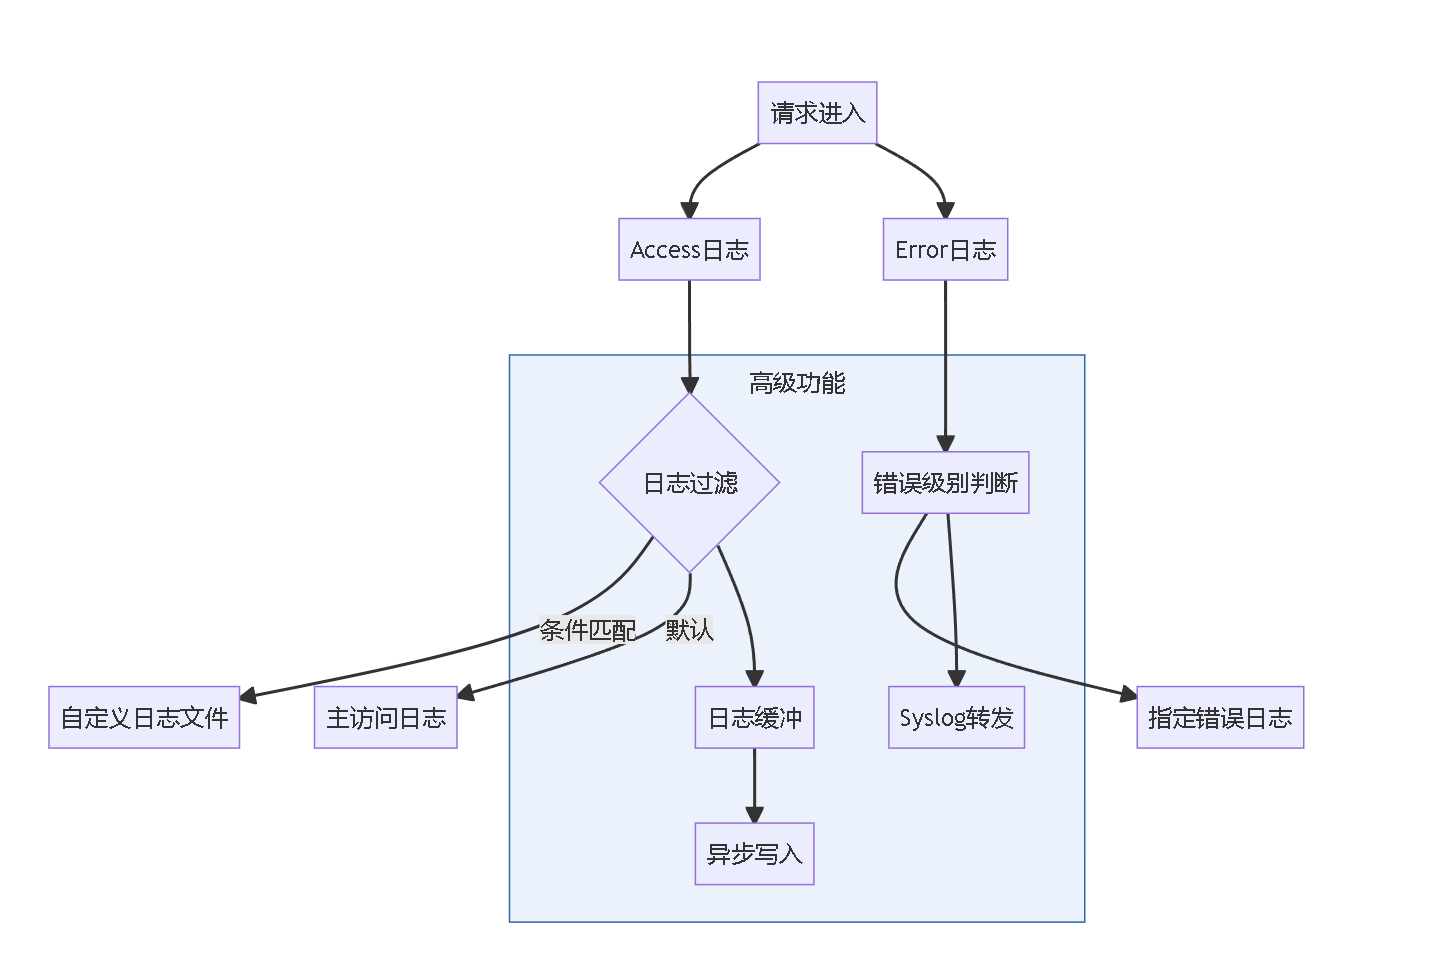
1.Nginx日志系统核心架构
1.1 日志处理流程图
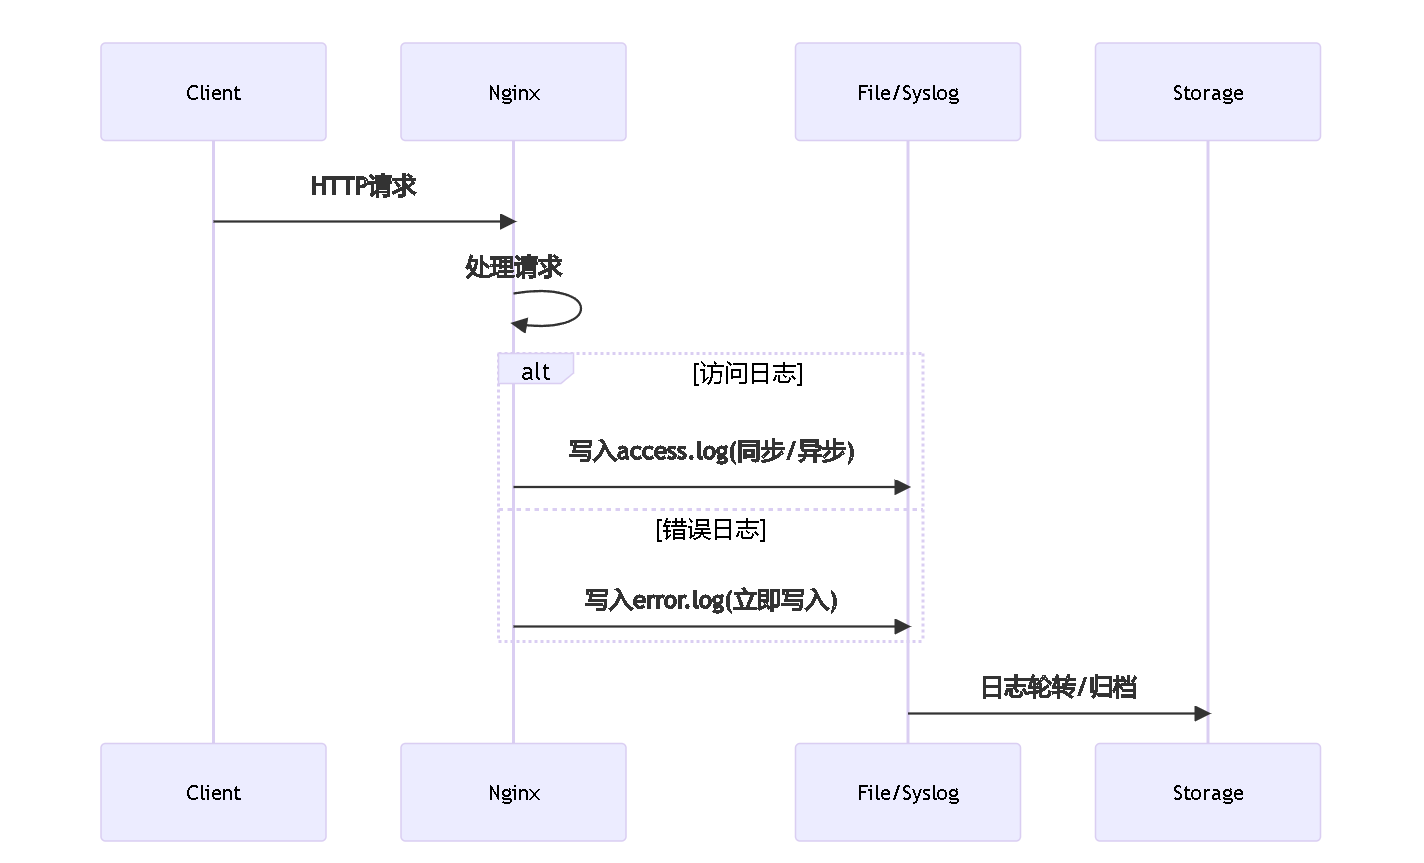
1.2 日志写入时序图
2.Nginx 自定义访问日志
访问日志是记录客户端即用户的具体请求内容信息,而在全局配置模块中的error_log是记录nginx服务 器运行时的日志保存路径和记录日志的level,因此两者是不同的,而且Nginx的错误日志一般只有一 个,但是访问日志可以在不同server中定义多个,定义一个日志需要使用access_log指定日志的保存路 径,使用log_format指定日志的格式,格式中定义要保存的具体日志内容。
访问日志由 ngx_http_log_module 模块实现
日志格式的常见变量
$remote_addr 			# 记录客户端IP地址
$remote_user 			# 记录客户端用户名
$time_local 			# 记录通用的本地时间
$time_iso8601 			# 记录ISO8601标准格式下的本地时间
$request 				# 记录请求的方法以及请求的http协议
$status 				# 记录请求状态码(用于定位错误信息)
$body_bytes_sent 		# 发送给客户端的资源字节数,不包括响应头的大小
$bytes_sent 			# 发送给客户端的总字节数$msec # 日志写入时间。单位为秒,精度是毫秒
$http_referer 			# 记录从哪个页面链接访问过来的
$http_user_agent 		# 记录客户端浏览器相关信息
$http_x_forwarded_for 	#记录客户端IP地址
$request_length 		# 请求的长度(包括请求行,请求头和请求正文)。
$request_time 			# 请求花费的时间,单位为秒,精度毫秒


# 注:如果Nginx位于负载均衡器,nginx反向代理之后,web服务器无法直接获取到客 户端真实的IP地址。
# $remote_addr获取的是反向代理的IP地址。 反向代理服务器在转发请求的http头信息中,
# 增加X-Forwarded-For信息,用来记录客户端IP地址和客户端请求的服务器地址
2.1 自定义默认格式日志
# 默认日志格式

http {
   log_format main  '$remote_addr - $remote_user [$time_local] "$request" '
                    '$status $body_bytes_sent "$http_referer" '
					'"$http_user_agent" "$http_x_forwarded_for"';
   access_log /var/log/nginx/access.log main;

# 如果是要保留日志的源格式,只是添加相应的日志内容,则配置如下:
# 注意:此指令只支持http块,不支持server块
log_format access_log_format  '$remote_addr - $remote_user [$time_local] "$request" '
                      		  '$status $body_bytes_sent "$http_referer" '
                              '"$http_user_agent" "$http_x_forwarded_for"'
                              '$server_name:$server_port';

# 注意:此指令一定要在放在log_format命令后
access_log logs/access.log   access_log_format;
[root@Ubuntu2204 ~]#vim /apps/nginx/conf/nginx.conf
http {
......
......
......
log_format access_log_format  '$remote_addr - $remote_user [$time_local] "$request" '
                                  '$status $body_bytes_sent "$http_referer" '
                                  '"$http_user_agent" "$http_x_forwarded_for"'
                                  '$server_name:$server_port';

access_log logs/access.log   access_log_format;
......
......
......
}
[root@Ubuntu2204 ~]#nginx -t
[root@Ubuntu2204 ~]#nginx -s reload

# 访问10.0.0.100 测试自定义格式日志
[root@Rocky8 ~]#curl 10.0.0.100

[root@Ubuntu2204 ~]#tail /apps/nginx/logs/access.log -f

10.0.0.8 - - [20/Jul/2024:22:31:28 +0800] "GET / HTTP/1.1" 200 615 "-" "curl/7.61.1" "-"localhost:80
10.0.0.8 - - [20/Jul/2024:22:31:29 +0800] "GET / HTTP/1.1" 200 615 "-" "curl/7.61.1" "-"localhost:80
10.0.0.8 - - [20/Jul/2024:22:31:30 +0800] "GET / HTTP/1.1" 200 615 "-" "curl/7.61.1" "-"localhost:80
2.2 自定义json格式日志
Nginx 的默认访问日志记录内容相对比较单一,默认的格式也不方便后期做日志统计分析,生产环境中 通常将nginx日志转换为json日志,然后配合使用ELK做日志收集,统计和分析。
log_format access_json '{"@timestamp":"$time_iso8601",'
        '"host":"$server_addr",'
        '"clientip":"$remote_addr",'
        '"size":$body_bytes_sent,'
        '"responsetime":$request_time,' #总的处理时间
        '"upstreamtime":"$upstream_response_time",'
        '"upstreamhost":"$upstream_addr",'   #后端应用服务器处理时间
        '"http_host":"$host",'
        '"uri":"$uri",'
        '"xff":"$http_x_forwarded_for",'
        '"referer":"$http_referer",'
        '"tcp_xff":"$proxy_protocol_addr",'
        '"http_user_agent":"$http_user_agent",'
        '"status":"$status"}';
access_log /apps/nginx/logs/access_json.log access_json;
json 格式的日志访问统计
[root@Ubuntu2204 ~]#vim /apps/nginx/conf/nginx.conf
http {
......
......
......
log_format access_json '{"@timestamp":"$time_iso8601",'
        '"host":"$server_addr",'
        '"clientip":"$remote_addr",'
        '"size":$body_bytes_sent,'
        '"responsetime":$request_time,'
        '"upstreamtime":"$upstream_response_time",'
        '"upstreamhost":"$upstream_addr",'
        '"http_host":"$host",'
        '"uri":"$uri",'
        '"xff":"$http_x_forwarded_for",'
        '"referer":"$http_referer",'
        '"tcp_xff":"$proxy_protocol_addr",'
        '"http_user_agent":"$http_user_agent",'
        '"status":"$status"}';
     access_log /apps/nginx/logs/access_json.log access_json;

......
......
......
}
[root@Ubuntu2204 ~]#nginx -t
[root@Ubuntu2204 ~]#nginx -s reload

# 访问10.0.0.100 测试自定义json格式日志
[root@Rocky8 ~]#curl 10.0.0.100

[root@Ubuntu2204 ~]#vim nginx_json.py

#!/usr/bin/env python3
#coding:utf-8
status_200= []
status_404= []
with open("access_json.log") as f:
    for line in f.readlines():
        line = eval(line)
        if line.get("status") == "200":
            status_200.append(line.get)
        elif line.get("status") == "404":
            status_404.append(line.get)
        else:
            print("状态码 ERROR")
        print((line.get("clientip")))
f.close()
print("状态码200的有--:",len(status_200))
print("状态码404的有--:",len(status_404))

[root@Ubuntu2204 ~]#mv nginx_json.py  /apps/nginx/logs/
[root@Ubuntu2204 ~]#cd /apps/nginx/logs/
[root@Ubuntu2204 logs]#python3 nginx_json.py
10.0.0.8
10.0.0.8
10.0.0.8
状态码200的有--: 3
状态码404的有--: 0
2.3 不记录访问日志
一个网站会包含很多元素,尤其是有大量的images、js、css等静态资源。这样的请求可以不用记录日志
#请求favicon.ico时,不记录日志
location /favicon.ico {
 access_log off;
 return 200;
}
#当有人访问gif、png等资源时,将日志丢入空
location ~* .*.(gif|jpg|png|css|js)$ {
   access_log /dev/null;
}
3.自定义访问日志路径
在 http、server 或 location 块中设置,例如:
http {
    access_log /var/log/nginx/custom_access.log main;
}

server {
    access_log /data/logs/nginx/my_site_access.log combined;
}

location /api/ {
    access_log /data/logs/nginx/api_access.log api_format;
}
/var/log/nginx/custom_access.log:自定义的访问日志路径
main / combined / api_format:是日志格式(可以自己定义)
4.自定义错误日志路径
http {
    error_log /var/log/nginx/custom_error.log warn;
}

server {
    error_log /data/logs/nginx/my_site_error.log error;
}
日志级别有:debug、info、notice、warn、error、crit
十一、nginx日志分析:模拟100个nginx请求,通过命令分析出访问量前5的IP,并列出访问的次数。进阶分析特定时间段的:如下午5点到7点(时间段自己定)
1.配置 Nginx 日志记录模拟 IP
为了让 curl 伪造的 IP 被记录下来,你需要修改 Nginx 的日志格式,记录 X-Forwarded-For:
编辑 nginx.conf 中的 http 块:
[root@nginx2 conf]# vim nginx.conf

#在http块中加入
log_format custom '$http_x_forwarded_for - [$time_local] "$request" $status';
access_log /var/log/nginx/access.log custom;
2.重启服务
[root@nginx2 conf]# systemctl restart nginx
3.模拟 100 个请求 + 伪造 IP
[root@nginx2 conf]# for i in {1..100}; do
> ip="192.168.0.$((RANDOM % 10 + 1))"
> curl -s -o /dev/null -H "X-Forwarded-For: $ip" http://127.0.0.1/
> done
4.分析访问量前 5 的 IP
[root@nginx2 conf]# awk '{print $1}' /var/log/nginx/access.log | sort | uniq -c | sort -nr | head -5
     14 192.168.0.2
     13 192.168.0.8
     11 192.168.0.6
     11 192.168.0.1
     10 192.168.0.4
5.分析特定时间段(如 17:00 ~ 18:59)
[root@nginx2 conf]# awk '$3 >= "[20/Jun/2025:17:00:00" && $3 <= "[20/Jun/2025:18:59:59"' /var/log/nginx/access.log
> | awk '{print $1}' | sort | uniq -c | sort -nr | head -5
     14 192.168.0.2
     13 192.168.0.8
     11 192.168.0.6
     11 192.168.0.1
     10 192.168.0.4
✅ 附加:查看某 IP 的所有请求时间
[root@nginx2 conf]# grep '192.168.0.7' /var/log/nginx/access.log | awk '{print $2, $3, $4}'
- [20/Jun/2025:18:07:55 +0800]
- [20/Jun/2025:18:07:55 +0800]
- [20/Jun/2025:18:07:55 +0800]
- [20/Jun/2025:18:07:55 +0800]
- [20/Jun/2025:18:07:55 +0800]
- [20/Jun/2025:18:07:55 +0800]
- [20/Jun/2025:18:07:55 +0800]
- [20/Jun/2025:18:07:55 +0800]
- [20/Jun/2025:18:07:55 +0800]